


14+ Employee Newsletter Examples, Ideas & Templates


If there’s one thing I’ve done a lot over the past few years, it’s test tools.
From designing internal playbooks and onboarding guides to building out training decks and interactive explainers, I’ve tried just about every visual content tool that promises to “make learning engaging.”
Some deliver. Most don’t.
While I haven’t worked directly inside Articulate 360, I have spent over half a decade using Visme to create everything from sales presentations and data visualizations to custom infographics and interactive, client-facing pitch decks.
So yeah, I know exactly what it’s great at…and where it might not be the best fit.
That’s why I put this comparison together.
Not to pit two tools against each other in some dramatic showdown, but to honestly break down how Visme and Articulate 360—a powerhouse in traditional eLearning—stack up.
Where each shines, where they fall short and ultimately, which one’s the better pick, depending on what you need.
Whether you’re a trainer, instructional designer or content creator looking to scale up your visual communication, I’ll walk you through exactly how Visme and Articulate 360 compare across ease of use, interactivity, course design, AI tools, pricing and more.
Let’s get to it.
First off, this guide isn’t written by AI or stitched together from a bunch of spec sheets.
It’s written by a real human (hi 👋) who actually tested both tools, with the goal of helping you, another real human, make the right choice.
To get a feel for Articulate 360, I signed up for their 30-day free trial. No credit card was required during signup, just a business email to verify the account. That gave me access to the full suite: Rise 360, Review 360, Reach and the content library.
I spent time inside the platform exploring how everything works. And to make sure I didn’t miss anything, I backed that up with walkthroughs, YouTube tutorials, demo projects, user reviews from G2, Reddit and Articulate’s own E-Learning Heroes community.
One quick note: I’m using a Mac, which means I wasn’t able to test Storyline 360 directly since it’s only available on Windows. So, anything you see related to Storyline in the article is sourced from another expert.
And as for Visme? I’ve been using it for over five years and know the platform inside out.
Plus, I’m on the paid version, so I have full access to everything Visme offers: premium templates, animated assets, brand kits, collaboration tools, analytics, AI-powered design features, interactivity settings and more. So yes, this comparison is fair, hands-on, and human.
*Disclaimer: The comparisons and competitor ratings presented in this article are based on features available as of May 30, 2025. We conduct thorough research and draw on both first-hand experience and reputable sources to provide reliable insights. However, as tools and technologies evolve, we recommend readers verify details and consider additional research to ensure the information meets their specific needs.
Before I dive into each feature side by side in this Articulate 360 vs Visme review, here’s a quick overview of my overall thoughts and findings after testing both tools:
| Feature | Visme | Articulate 360 |
| Ease of Use | Beginner-friendly drag-and-drop; fast learning curve | Easy in Rise; Steeper learning curve in Storyline |
| Pre-Built Templates Library | 10,000+ templates across formats; highly customizable | 1,000+ course templates in Rise; Slide templates in Storyline via Content Library |
| Asset Library | Large built-in library of icons, illustrations, characters, and stock photos and videos | Built-in stock photo library, no icons/illustrations/characters in Rise; Extensive characters, stock media in Storyline |
| Animation & Interactivity | Full animation timeline + clickable elements, hotspots, hover effects, etc. | Basic in Rise; Advanced interactivity in Storyline |
| Quizzing & Assessments | Custom quizzes via Visme Forms with branding and SCORM export | Basic in Rise; Advanced logic, question types, branching in Storyline |
| Course Creation | Flexible structure; build as presentations or interactive hubs with full design control | Structured in Rise; Custom, scenario-based in Storyline |
| Course Management | Organize with folders, labels, workspaces; easy versioning | Streamlined in Rise; Manual in Storyline (desktop-based) |
| AI Features & Smart Tools | AI writer, image generator, editor, text-to-speech, resize, brand wizard, more | AI course builder, AI block generation, knowledge check, summary, image gen |
| Brand Kit | Dedicated brand kit with reusable assets and themes | No brand kit; workaround via reusable branded blocks |
| LMS and SCORM/xAPI Support | Supports SCORM 1.2, SCORM 2004, xAPI; bookmarking and export settings included | Supports SCORM 1.2, SCORM 2004, xAPI, cmi5, AICC + Reach 360 LMS |
| Team Collaboration & Workflows | Collaborate via shared folders and workspaces; flexible permissions | Team folders, Review 360 for feedback, simple collaboration in Rise |
| Sharing, Publishing & Export Options | Link sharing, embeds, multiple export formats including SCORM/xAPI | SCORM export, LMS publish, Reach 360 delivery, web and LMS formats |
| Customer Support & Resources | Live chat, tutorials, blogs, webinars, email support | Priority support for teams, tutorials, E-Learning Heroes community |
| Design & Training Ecosystem | Focused on visual content; strong for branded training and marketing materials | Strong L&D ecosystem with Storyline, Rise, Review and Reach |
| Pricing | Free; paid plans starting at $12.25/month | Starts at $1199/year |
| G2 Ratings | 4.5/5 (445 reviews) | 4.6/5 (177 reviews) |
Scroll down for detailed insights and visual comparisons of how each tool looks, works and handles key features in real workflows.
Let’s start with what matters most when you’re just getting started: how easy it is to get the hang of these tools.
Because let’s be honest: It doesn’t really matter how powerful a platform is if you’re going to waste hours just figuring out how to use it.
Here’s a quick look at how Visme and Articulate 360 compare on usability:
| Visme | Articulate 360 | |
| Learning Curve | Beginner-friendly; intuitive drag-and-drop editor | Easy to pick up; block-based builder with minimal learning curve; Storyline is more complex. |
| Interface | Clean, modern, and clutter-free; easy to navigate even for non-designers | Clean and structured, but limited design flexibility |
| Setup Time | Instant access—start creating right after sign-up | Quick start, especially with pre-built course templates |
| Editor Experience | Visual, flexible, and fast (ideal for quick creation) | Smooth and fast, but limited to stacking content blocks in set layouts |
I’ve always found Visme ridiculously easy to use. You log in, pick a template (or don’t, you can start from scratch) and just start dragging things around.
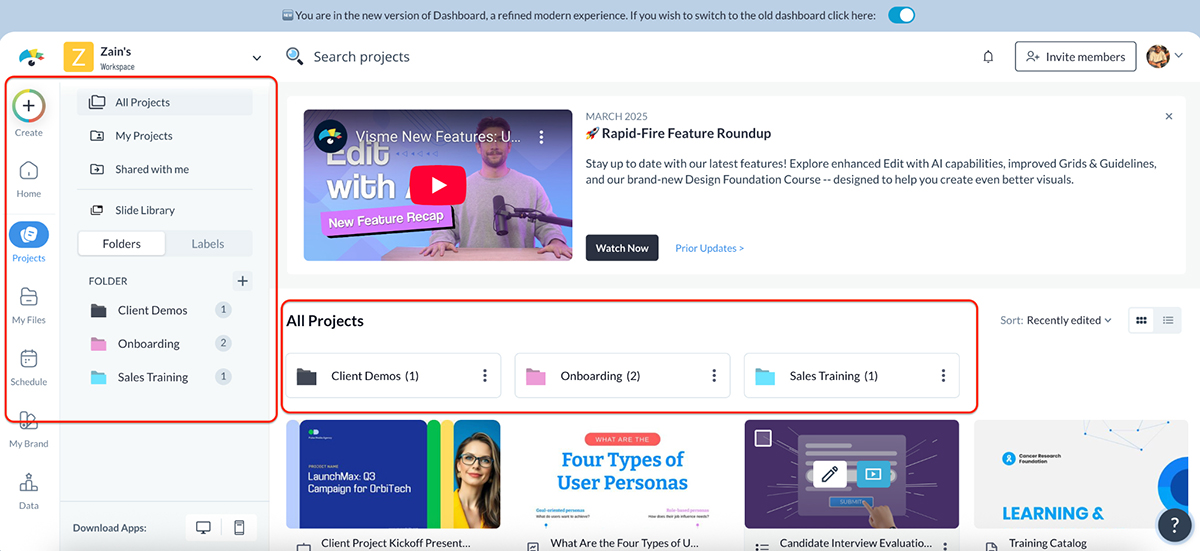
The dashboard is brilliantly thought out.
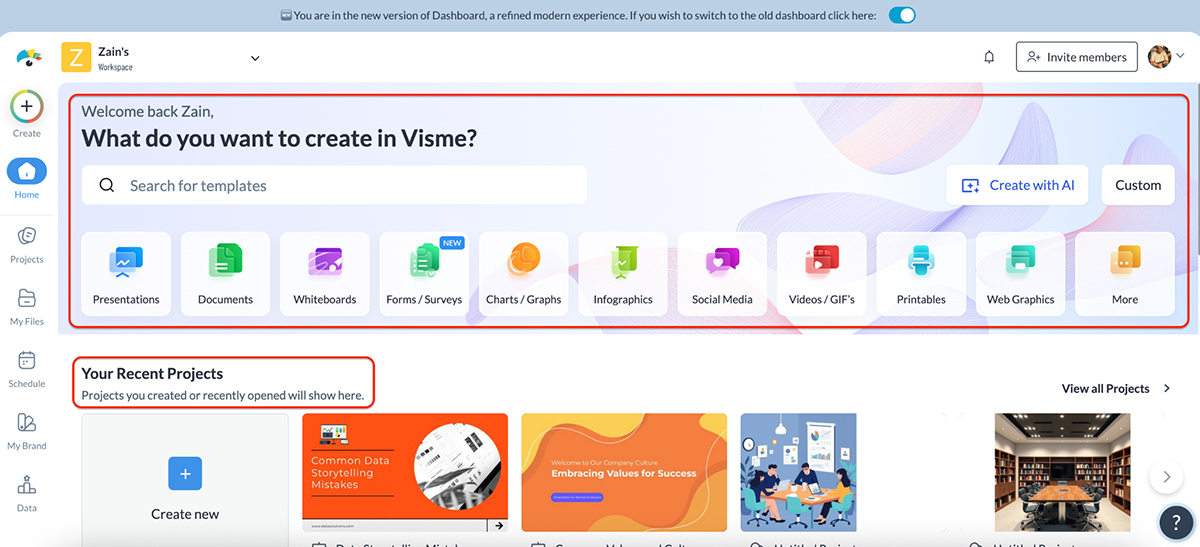 You can quickly launch a new project or jump back into anything you were working on. No onboarding maze. No interface shock. Just a clean workspace that makes sense, even if you’ve never designed a thing in your life.
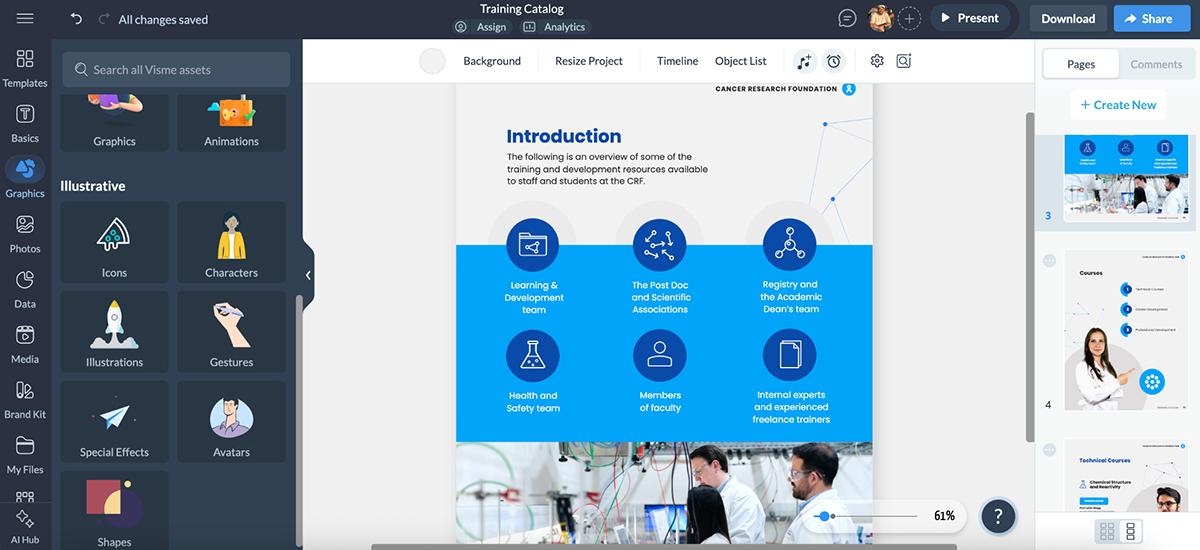
And that’s not all. It gets even better inside the editor.
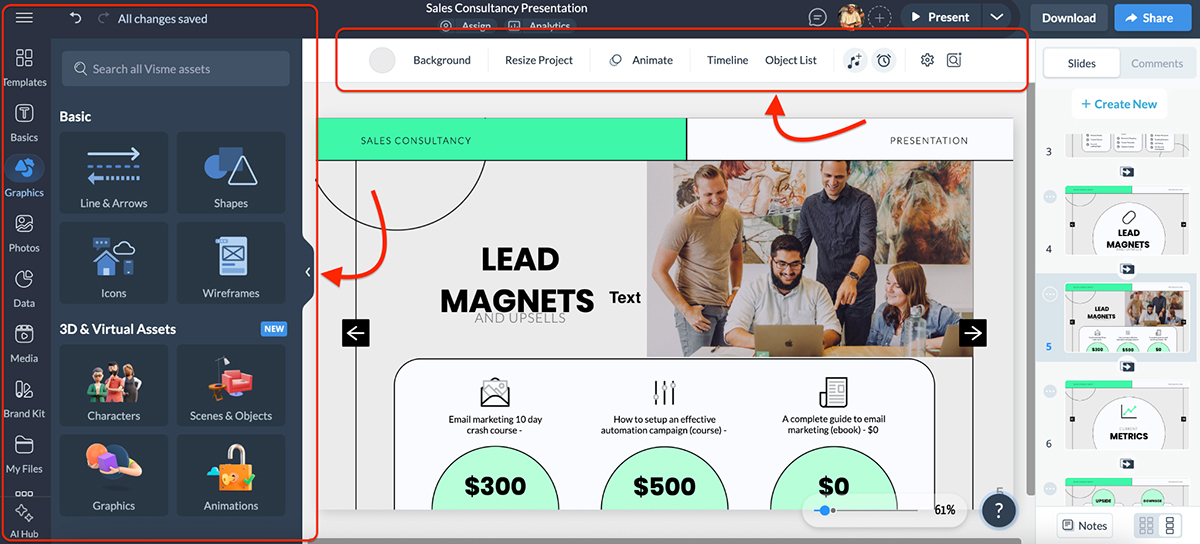 Everything is tucked neatly into the sidebar, drag-and-drop is seamless and nothing feels clunky or hidden. Plus, the top toolbar offers quick access to essential tools, and on the right side, you can see your slides, add new ones effortlessly and adjust transitions to keep your designs flowing smoothly.
It’s one of those tools where things just work the way you expect them to.
Articulate 360 (or more specifically, Rise 360) takes a slightly different approach when it comes to using the platform.
Unlike Visme, which gives you full creative control to move things around freely, Rise is built specifically for course creation and microlearning. And that shows in how structured everything feels.
When you log in, you land on a clean dashboard with your courses laid out as cards.
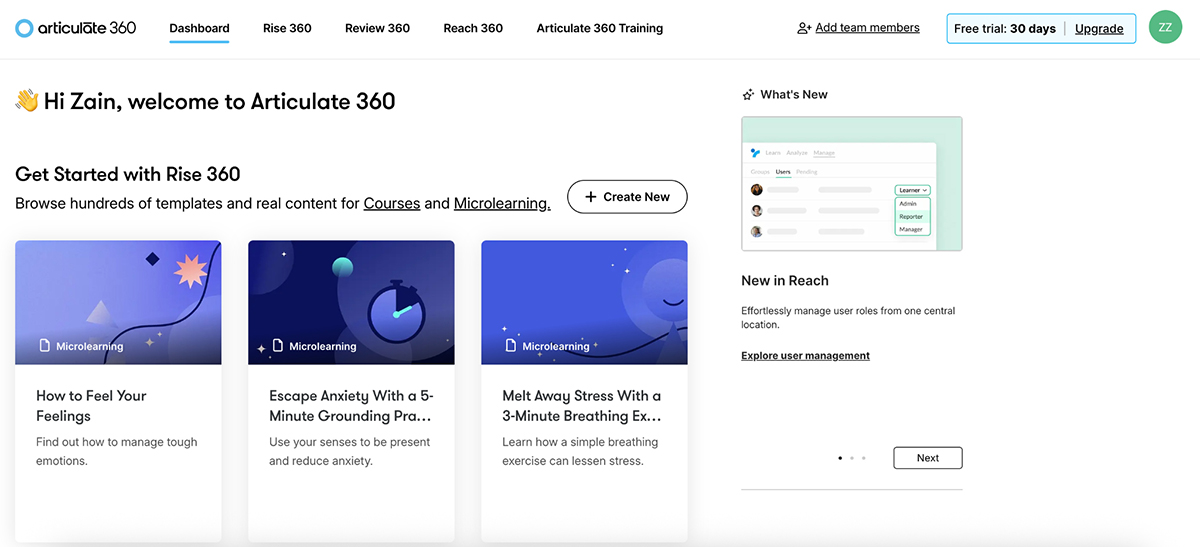 Starting a new one is simple—just hit “Create New,” choose a course or microlearning template (or start from scratch), and you’re off.
The builder itself is block-based. You stack sections like text, image, video, and quiz blocks and move them around to build your lesson.
It’s easy to use and fast—great for getting structured training content out the door without overthinking the design.
The only tradeoff, however, is that you’re working within fixed layouts.
You can’t move elements freely, resize visuals or control detailed formatting like you can in Visme. Design-wise, it’s very much “fill in the blanks,” not “create from scratch.”
Overall, Rise does exactly what it’s built for, and it does it well. It’s great if you want structure and speed. But not so great if you want visual flexibility or brand creativity.
You’ll hit limits pretty quickly if you’re looking to go beyond linear, layout-driven courses. For that, you’ll need to use Storyline 360—Articulate’s more advanced (and much more complex) content authoring tool built for custom, scenario-based learning.
Here’s a great video by Sabrina Gonzales, an instructional designer, where she shares her experience learning Storyline 360 from scratch:
She covers what to focus on as a beginner, how to build confidence with the core features and even walks through one of her early projects—from a simple layout to a more advanced version with xAPI tracking and interactivity.
Not everyone has time to design from scratch. And honestly, why should you, if the tool already comes with well-made templates?
Here’s how Visme and Articulate 360 compare when it comes to their pre-built template libraries:
| Visme | Articulate 360 | |
| Template Library Size | 10,000+ | 1,000+ course templates in Rise; Slide templates in Storyline via Content Library 360 |
| Template Categories | Presentations, infographics, reports, eBooks, documents, storyboards, mockups, charts and graphs, forms and surveys, videos, etc | Rise: Courses & microlearning; Storyline: Scenario, quiz and layout templates |
| AI-Generated Templates | Available | Available in Rise |
| Customization Flexibility | Full layout and visual control | Structured in Rise; Customizable in Storyline via slide masters and timeline |
Among other things, Visme’s template library is one of my favorite parts of the platform.
You get access to thousands of professionally designed templates across just about every format: presentations, reports, proposals, infographics, documents, social graphics, dashboards—you name it.
And the best part? They don’t all look the same.
There’s real variety in terms of aesthetics. Whether your style is bold and modern, clean and corporate, or playful and colorful, you’ll find something that actually fits your brand and message.
Plus, everything you see in the professionally designed templates is completely customizable.
You’re not stuck with a fixed layout. You can move things around, swap icons, change fonts and colors, add animations and interactivity—basically, reshape the entire thing to match your vision.
Whether you’re building a training presentation or a multi-slide explainer, Visme gives you a solid head start without ever boxing you in.
Rise 360 organizes its pre-built templates into two main types: Courses and Microlearning.
From there, you can drill down into subcategories like Customer Success, Diversity & Inclusion, Health & Wellness, Sales & Marketing, HR, IT and more. 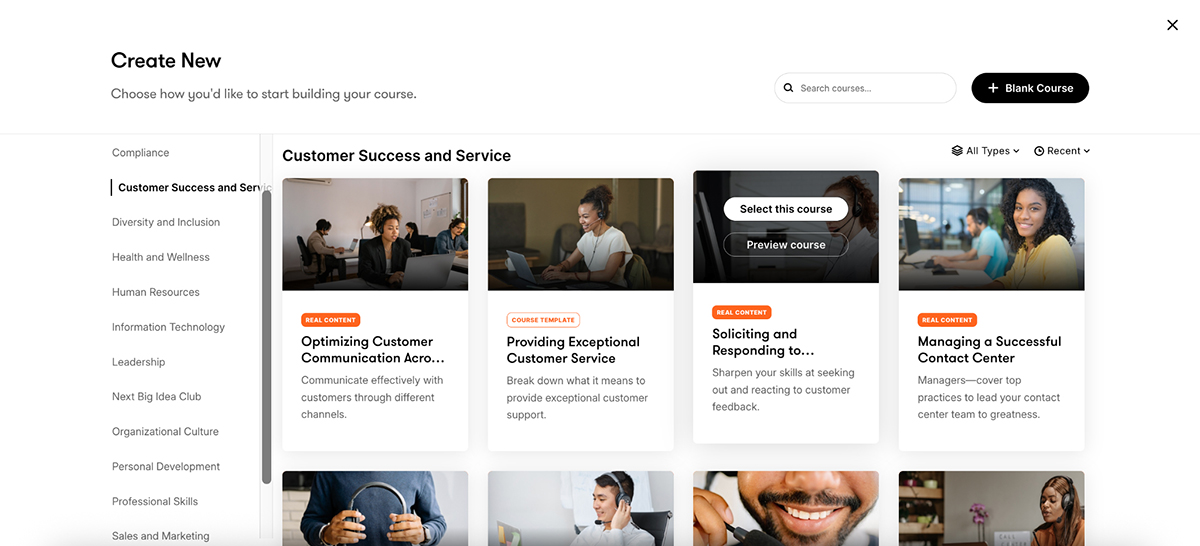
Each category includes a mix of “course templates” (structured outlines you can customize) and “real content” (fully built lessons you can reuse or modify).
The designs are varied, which is a big plus. You’re not stuck with just one look and feel. But the downside is that the customization is limited.
Sure, you can rearrange blocks, change the theme colors, add images and update the content, but you can’t break out of the fixed layout or fine-tune the design at a granular level.
Storyline 360, on the other hand, is integrated with Content Library 360. It gives you access to hundreds of professionally designed slide templates, character sets and multimedia assets.
You can browse and insert these directly into your projects—no downloads needed, just an internet connection. It’s a big time-saver if you want polished, ready-to-use layouts while still customizing for your learning goals. Articulate also updates the library regularly, so there’s always something new to work with.
Check out this video of Tom Kuhlmann, Chief Learning Architect of Articulate:
In short, Rise follows a uniform structure and gives you consistency, but not much room for creative freedom. Storyline, even though a bit complex to get used to, gives you that much-needed control.
Templates are great, but they’re only part of the equation. What really speeds things up and levels up your content is having access to ready-made assets: icons, illustrations, photos, characters, videos, animations and more.
Here’s how Visme and Rise 360 compare when it comes to built-in content libraries:
| Visme | Articulate 360 | |
| Icons & Illustrations | 100,000+ customizable icons, illustrations and shapes | Not available in Rise; available in Storyline |
| Stock Photos / Videos | Built-in access to 1 million+ royalty-free images and videos | Built-in library of royalty-free stock photos |
| Characters & Animations | Flat and photo-realistic characters; animated graphics and transitions | No characters or animation support in Rise; available in Storyline. |
One of the things I rely on most when working inside Visme is the asset library. It’s packed.
You’ve got access to thousands of icons, illustrations, characters (both flat and photo-realistic), animated graphics, shapes, lines, data widgets—you name it.
Plus, I love that you can pull in high-res stock photos and videos from Unsplash, Pexels and more without ever leaving the workspace. You can also create a completely unique image using the AI image generator (more on this later).
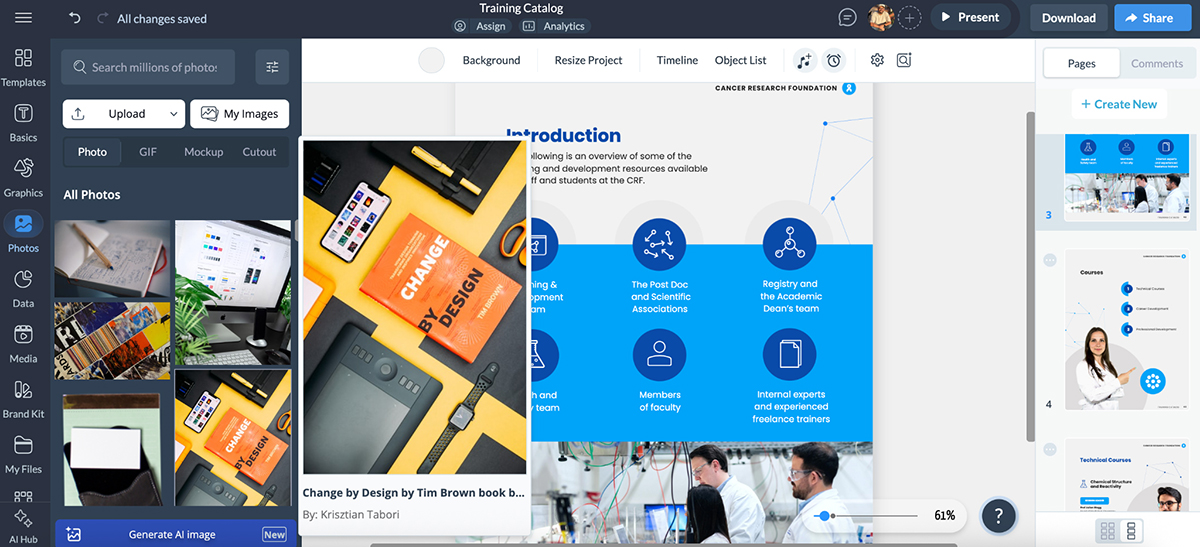
Everything’s searchable, neatly categorized and easy to plug into your designs.
You can even save brand assets or reuse elements across projects with folders and kits.
And it’s not just about volume, it’s about quality and control.
You can swap styles to match your brand, tweak colors and sizes, layer elements and even animate them directly inside your project. No need to jump between tools or hunt down visuals on third-party sites.
You can even bring these assets to life with interactivity. Clickable graphics, animated callouts or visual cues that guide your audience through the content in a more engaging way.
So, regardless of the project I’m working on—an interactive presentation deck or an explainer video—knowing that these assets are at my fingertips just makes my life that much easier.
Articulate 360’s Rise keeps things pretty simple when it comes to assets. You won’t find a massive media library or deep design controls, but you do get the essentials to support your content.
In blocks that support media, you can upload your own images or videos, or choose from a built-in library of curated stock photos. There’s also an AI image generator built in, but more on that later.)
What’s nice is that Rise also includes interactive block types like tabs, labeled graphics, process steps and knowledge checks.
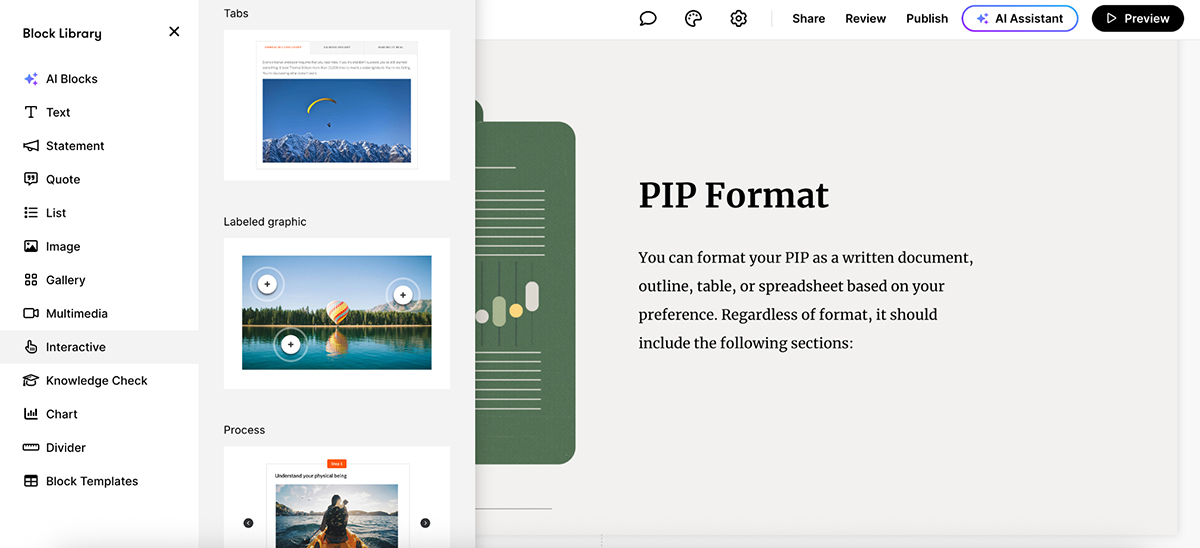
These help break up your content and add light interactivity without needing animation or coding skills.
But if you’re using Storyline 360, your asset options expand significantly.
Thanks to its integration with Content Library 360, Storyline users can access a wide range of pre-built slide templates, illustrated and photographic characters with multiple poses and expressions and millions of royalty-free stock photos, icons and videos.
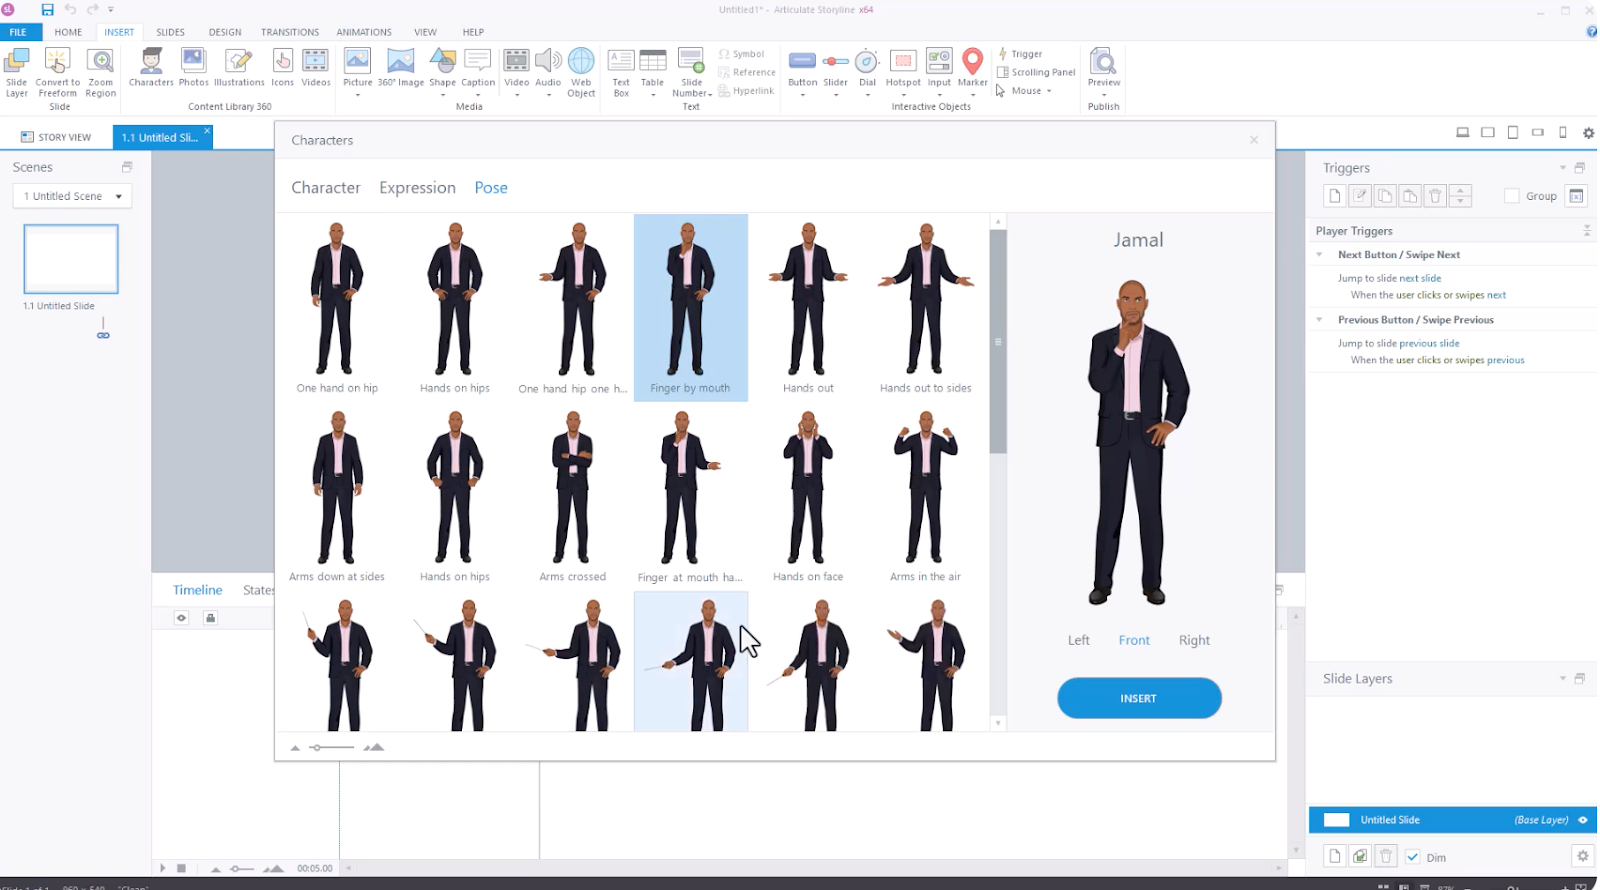
These assets are fully searchable and can be inserted directly into your slides. You also get basic shape and icon sets, though unlike Visme, you won’t find animated illustrations or granular visual customization tools.
Still, the availability of realistic characters and scenario-building assets in Storyline makes it ideal for instructional designers focused on narrative or role-based training.
While it lacks Visme’s variety of animated icons and interactive graphics, Storyline offers more eLearning-specific assets that align with formal training workflows.
So if you want a clean, structured layout with just enough interactivity to keep things moving, Rise works well. But if you’re building content that leans heavily on visual storytelling, branded design or dynamic interaction, Visme gives you way more to work with.
And if your content depends on characters, scenarios and classic eLearning structure, Storyline 360’s asset library is purpose-built for that.
The most effective learning materials aren’t just informative. They’re interactive.
When learners can click, explore and actively engage with the content, they’re far more likely to stay focused and actually retain what they’ve learned.
And both tools bring something different to the table. Here’s how Visme vs Articulate 360 compare when it comes to animation and interactivity:
| Visme | Articulate 360 | |
| Pre-Animated Assets | Includes a library of pre-animated 2D and 3D characters, icons, gestures and illustrations | Not available in either Rise or Storyline (animations must be added manually) |
| Interactive Elements | Buttons, hotspots, hover effects, pop-ups, internal navigation, transitions and dynamic fields | Limited in Rise (tabs, accordions, flashcards); Fully customizable in Storyline |
| Gamification / Visual Logic | Create quizzes, visual triggers, reveal-on-click elements | Basic in Rise; Full logic and scoring engine in Storyline |
Visme makes it ridiculously easy to add motion and interactivity to your projects.
You can animate pretty much any element on the canvas: text, icons, charts, images, shapes. Fade-ins, fly-ins, zoom spins, pops—it’s all there.
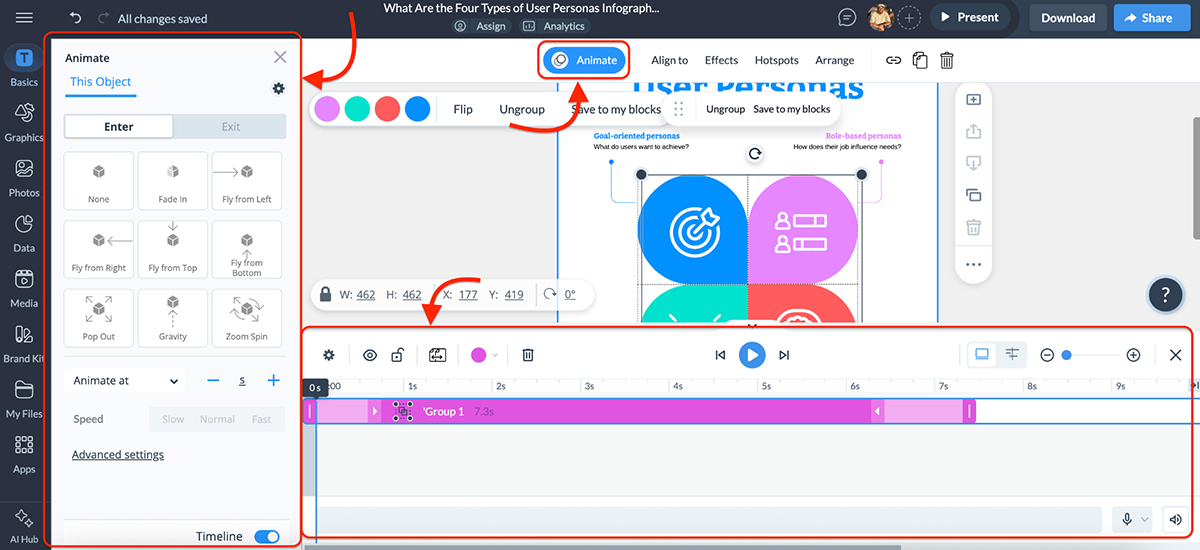 The interface gives you full control over how and when each animation plays, using a timeline editor that feels a lot like a lightweight video editing tool.
It lets you control timing, delay and order to build actual narrative flow and pacing, so your content doesn’t just look good, it guides the viewer through your message step by step.
But animation is only half the story. Visme also gives you a powerful set of interactive features that help turn static content into something clickable, layered and genuinely engaging.
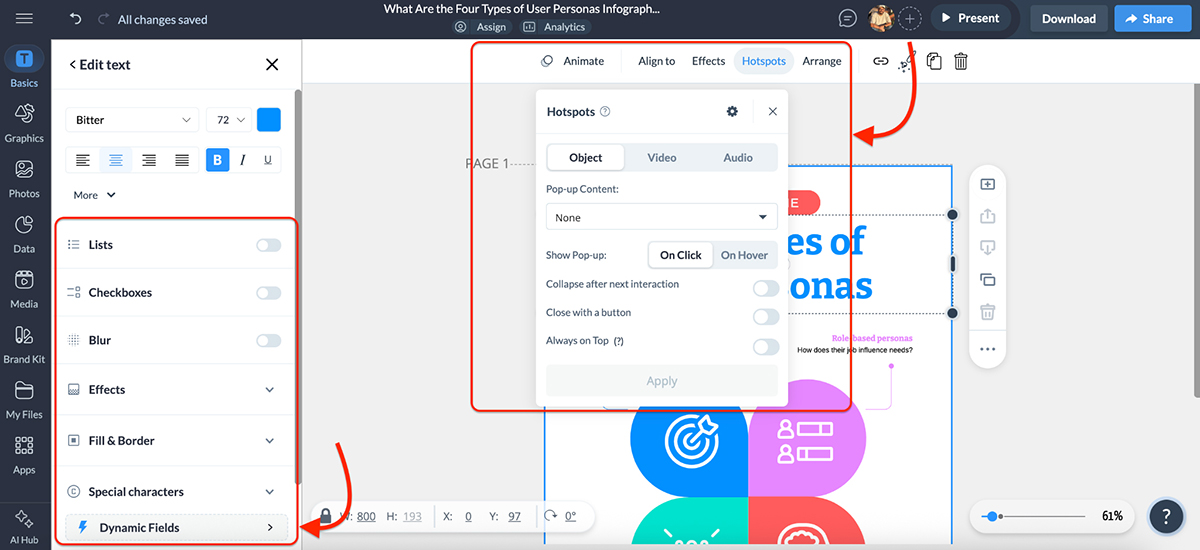
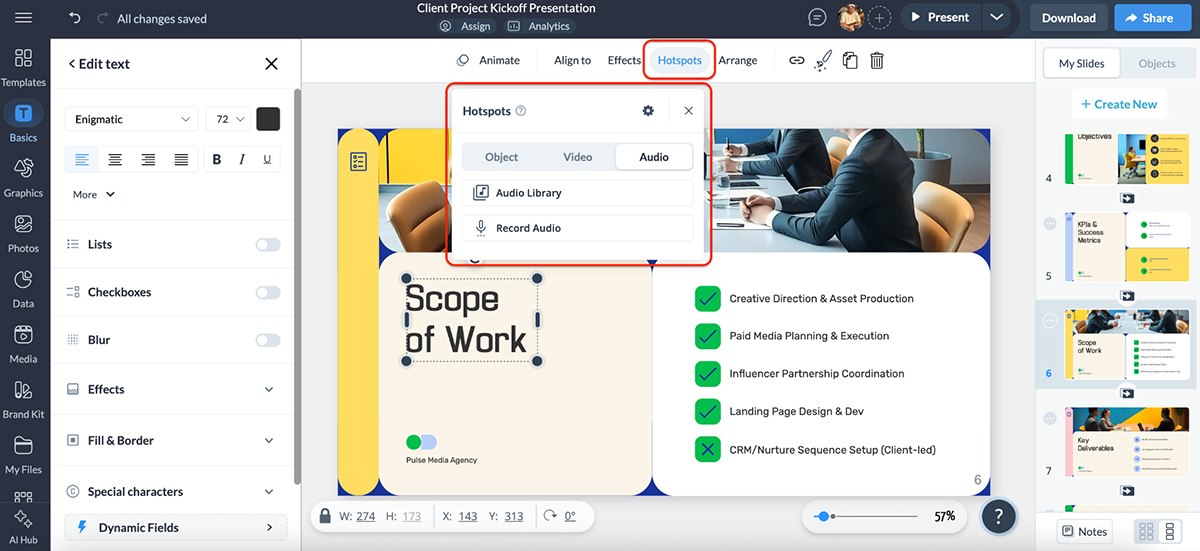
You can add hotspots to any object on the canvas; triggering popups, videos or audio clips on click or hover. It’s perfect for building guided walkthroughs, explainer overlays or multi-step visuals where learners explore at their own pace.
There’s also a growing list of effects you can apply to create subtle cues. And if you want to personalize your content, I love Visme’s dynamic fields feature that lets you pull in variables like a learner’s name, company or custom data fields, so your content adapts to whoever’s viewing it.
Rise 360 doesn’t offer animation in the traditional sense; no library of 2D or 3D animated characters, no slide transitions, timed entrances or motion effects. Everything appears static as you scroll.
But it does provide light interactivity through its block-based layout.
You can drop in elements like tabs, accordions, process steps, flash cards, timelines, buttons and knowledge checks to make your content more dynamic.
It’s a solid way to break up long pages and help learners absorb information in smaller, focused pieces. My favorite is the Labeled Graphic.
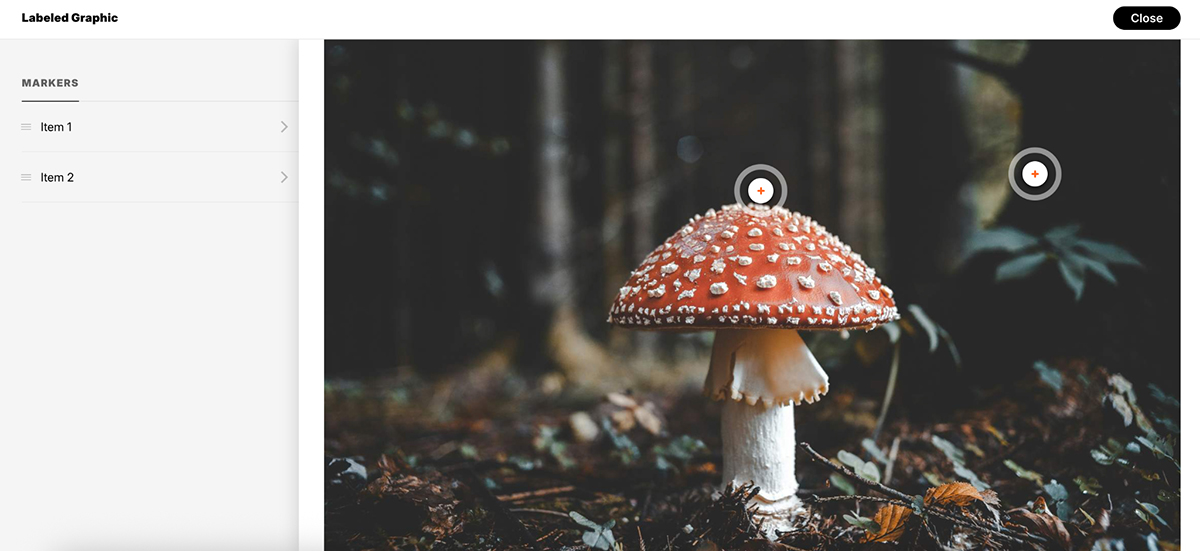 It lets you place clickable markers over an image—each of which can reveal supporting content like text, video or audio. It’s especially useful for creating exploratory graphics, product breakdowns or step-by-step visuals with layered explanations.
You can also embed quizzes, add checklists or create toggle-style sections. But if you need real animation and advanced interactivity, that’s where Storyline 360 comes in.
Storyline gives you a full animation timeline, motion paths, entrance/exit effects and the ability to trigger animations based on learner actions—something Rise doesn’t support.
You can build branching scenarios, layer slide content and apply variables and conditions to create highly customized learning experiences. While it’s more complex to use than Rise or Visme, Storyline is ideal for teams that need granular control over animations, triggers, and course logic.
For example, you can make an object appear only after a learner clicks a certain element or completes a prior interaction—great for adaptive learning paths and simulations.
Check out this video by Learning Dojo to learn how to animate in Storyline 360:
This is a big one.
Whether you’re building a course, onboarding flow or training module, you’ll eventually need to check if your learners are actually getting it.
Both tools offer ways to do that, but their approaches are pretty different.
Here’s how Visme and Articulate 360 compare when it comes to quizzes and assessments:
| Visme | Articulate 360 | |
| Quiz Builder | Visme Forms with drag-and-drop editor; animated characters and gestures included | No standalone builder in Rise; Full quiz builder in Storyline |
| Question Types | MCQ, true/false, short answer, polls | Limited in Rise (MCQ, fill-in-the-blank, sorting); Full range in Storyline (drag-and-drop, Likert, hotspots, etc.) |
| Customization | Full control over layout, fonts, colors, icons, characters, animations | Limited in Rise; Highly customizable in Storyline |
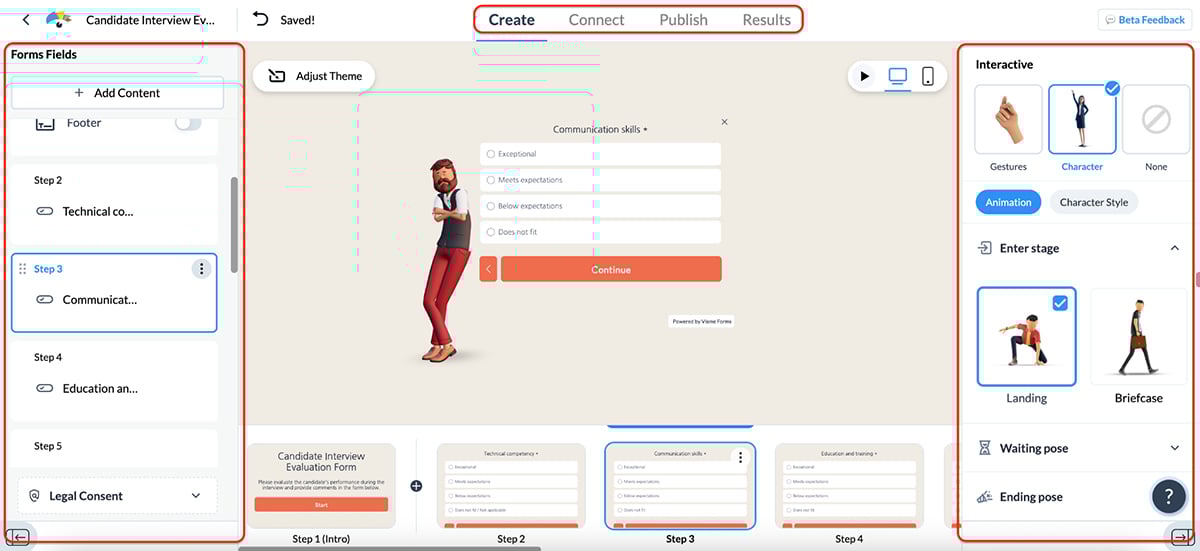
In Visme, quizzes and assessments are powered by Visme Forms, a feature that goes well beyond your standard question builder.
Whether you’re creating a quick knowledge check, a longer evaluation, a post-training feedback form or even a lead capture survey, Forms gives you the flexibility to design the entire experience your way.
You can start from scratch or pick from dozens of pre-built training templates designed for different use cases, like sales quizzes, employee evaluations and customer satisfaction check-ins.
Each template also lets you choose between different visual styles: classic cards, interactive characters, full-background layouts or gesture-based themes.
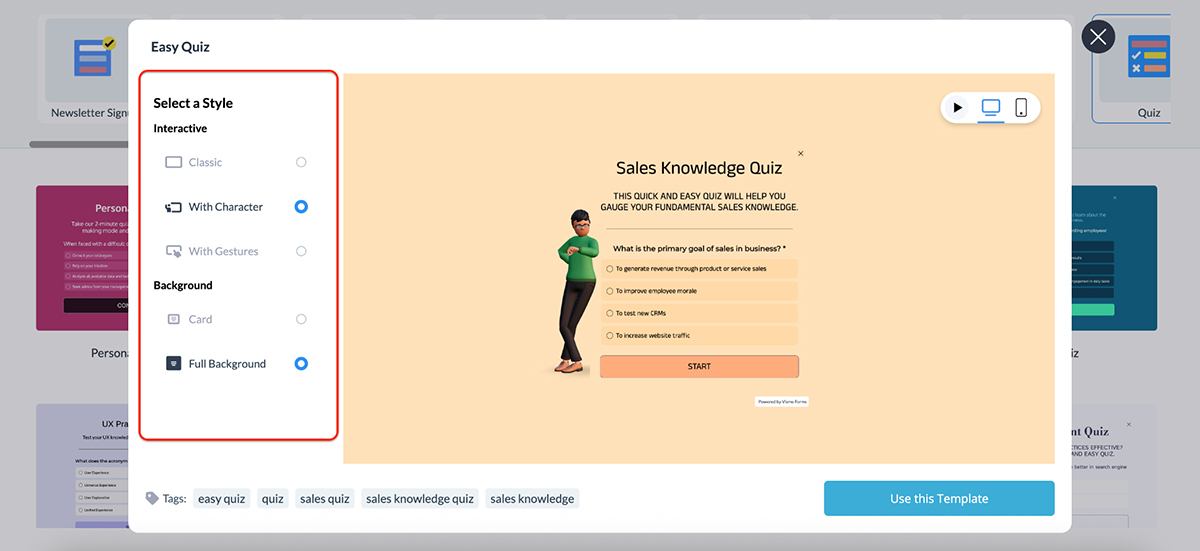
Forms with interactive characters are my favorite. They add personality and uniqueness to the forms. Love it.
The form editor itself is highly visual and incredibly customizable.
You can add icons, adjust fonts and colors, tweak spacing, change the layout and even insert branded visuals to make your quiz feel more immersive and on-brand. It’s a drag-and-drop experience that works just like the rest of Visme’s editor.
And yes, it’s fully responsive.
Whether your learners are opening the quiz on desktop, tablet or phone, your design adapts perfectly across screen sizes.
You can mark correct answers, review each respondent’s selections in the Results tab, and export your quiz using SCORM to plug it into any Learning Management system (LMS) easily.
If you’re looking to create quizzes that are visually engaging, branded and responsive, Visme Forms is built to deliver exactly that.
Quizzes and assessments in Rise are built directly into the same block-based workflow.
You can add Knowledge Check blocks to test understanding as learners move through your content. I like the variety of question types available here: multiple choice, multiple response, matching and fill-in-the-blank.
There’s also an AI Knowledge Check that automatically generates quiz questions based on your lesson content—handy if you want to save time creating assessments from scratch.
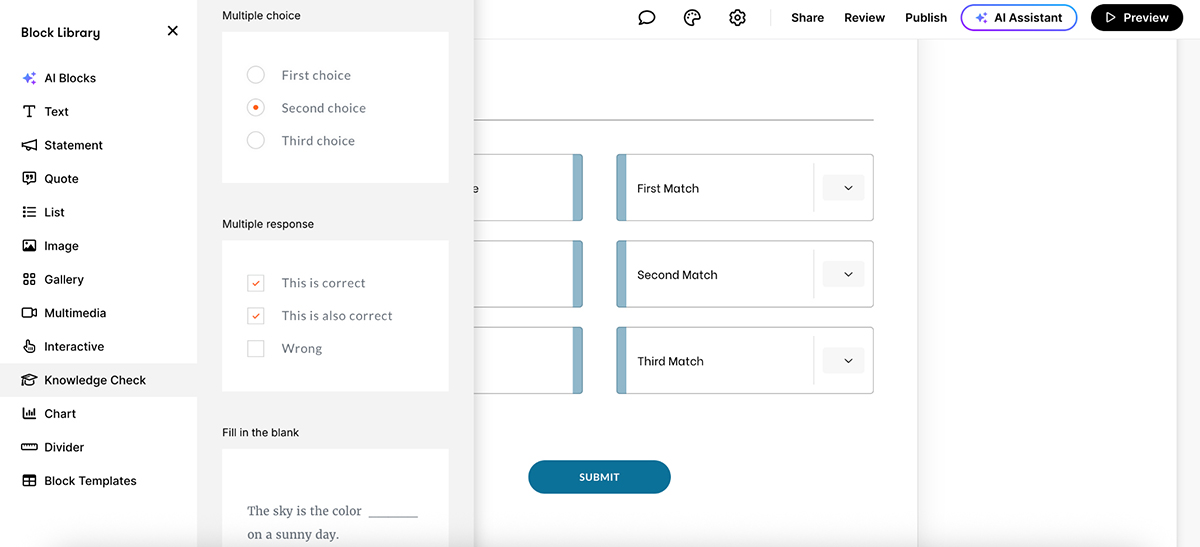
You can also use Matching and Sorting blocks to evaluate learners' responses. All brilliant for reinforcing learning in small bursts without disrupting the flow of the course.
You can configure feedback for each question, show explanations for right or wrong answers and let learners retry if needed.
But if you need full control over quiz logic, adaptive paths and scoring—Storyline 360 is where Articulate really shines.
Storyline offers a standalone quiz builder with a wide range of graded and ungraded question types, including drag-and-drop, hot spot, Likert scale, freeform, pick-many and more.
You can create question banks, randomize questions, assign points and build remediation logic that sends learners to specific slides based on their performance.
It also supports branching, so your quiz experience can adapt depending on the learner’s choices or answers.
Check out this fun and simple video by Tiffany to learn how to create interactive quizzes in Storyline:
Overall, I believe Rise is great for embedding light quizzes into structured content.
But if you want visually branded assessments with full design freedom, Visme is clearly the better pick. And if you need advanced logic, branching scenarios and LMS-grade testing, Storyline 360 is built exactly for that.
How a tool handles structure and flow can make or break your course-building experience. These two take very different approaches. Depending on how you like to work, one might suit you better than the other. Here’s a quick look at how they compare when it comes to course creation:
| Visme | Articulate 360 | |
| Course Structure | Presentation-style; multi-slide projects with links and navigation | Structured and modular in Rise; Freeform, slide-based in Storyline |
| Templates | Presentations, documents, infographics, forms—any format can be adapted into a course | Course and microlearning templates in Rise; hundreds of pre-made slides and templates in Storyline’s content library) |
| Navigation | Full control | Linear in Rise; Fully customizable in Storyline |
Visme doesn’t use a traditional LMS-style course builder.
Instead, it gives you the freedom to design a course the way you want, whether that’s a multi-slide presentation, an interactive document or a visual learning hub.
Here’s how I do it: I take it slide by slide. I start by picking a training template and then make all the edits I need: content, design, layout, assets, everything. Once that’s in place, I turn it into a full-blown course by linking it all together.
I just select any element—text, button, icon—and press the Insert Link icon.
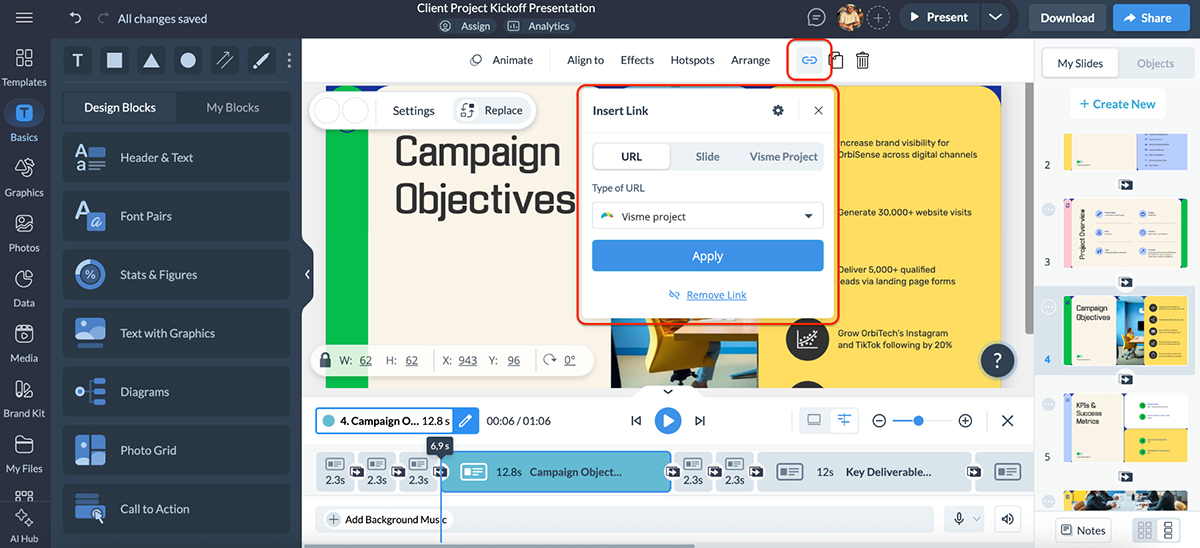
From there, I can connect it to an external URL, jump to another slide within the same project or even link out to a completely separate deck. This way, one project becomes a network of interactive lessons.
I also use hotspots to layer in things like video and audio for more context. It helps make the experience feel more complete and less like a flat deck of slides.
Now, I get that this isn’t the “traditional” way to build courses or microlearning content. But with everything Visme gives you, interactivity, design tools, branding options, it’s a trade-off I’m happy to make.
That said, if you’re looking for a plug-and-play course structure right out of the box, Rise, or its more advanced sibling, Storyline, might be a better fit.
This is where Rise shines: structured, lesson-based course creation.
To create a course, I picked one of their pre-made Course templates, which basically comes with multiple microlearning lessons already built in. Each lesson covers a focused topic, and together, they stack into a complete course.
You can rearrange lessons to give your modules a better flow, or click Edit Content to jump into any individual lesson and make changes.
The editor works the same whether you’re creating a complete course or a standalone microlearning module. You can edit text, change formatting and style of the blocks, add/remove interactive blocks, and so on.
Everything is straightforward. No surprise here. If you know the type of eLearning you want to create, building out a full course shouldn’t take more than an hour.
But if you need full design freedom, advanced logic or non-linear navigation, Storyline 360 is where Articulate really differentiates itself.
Unlike Rise, which follows a fixed block structure, Storyline gives you a blank canvas to build custom slide-based learning experiences.
You can create branching paths, gated interactions, simulations and scenario-based modules using triggers, variables and layers.
It’s ideal for instructional designers who need control over every aspect of course structure, from flow to feedback to learner progress logic.
In short, if you need speed, structure and LMS compatibility, without worrying too much about customization, Rise 360 absolutely gets the job done. If you need flexibility, interactivity and advanced sequencing, Storyline 360 is your go-to.
Once your course is built, how you organize, update and share it matters just as much, especially if you’re handling multiple projects or working with others.
Here’s how Visme and Articulate 360 compare:
| Visme | Articulate 360 | |
| Project Dashboard | Visual folder system with labels and multi-workspace support | Card-based dashboard in Rise; Manual file management in Storyline |
| Collaboration Access | Share folders with view/edit access | In Rise via team folders; Storyline requires file sharing or use of Review 360 |
| Version Control | Duplicate, update and track changes easily | Basic in Rise; Manual but precise control in Storyline |
Managing courses in Visme is straightforward and flexible, especially when you’re juggling multiple projects or updating content regularly.
Everything lives inside a clean, visual dashboard. You can organize your courses into folders, tag them with labels, or split them across workspaces if you’re managing different teams or topics. I usually keep things grouped by use case—like Onboarding, Sales Training and Client Demos.
Need to make changes? Just open the project, update your content and hit publish. You can also duplicate existing decks if you want to reuse a format or build a variation without starting from scratch.
Once your folders are set, you can share them with specific team members, either giving them view-only or full edit access, depending on the need.
Overall, I find it easy to manage and maintain multiple courses in one place without things slipping through the cracks.
Course management in Rise 360 is tidy, straightforward and built for efficiency.
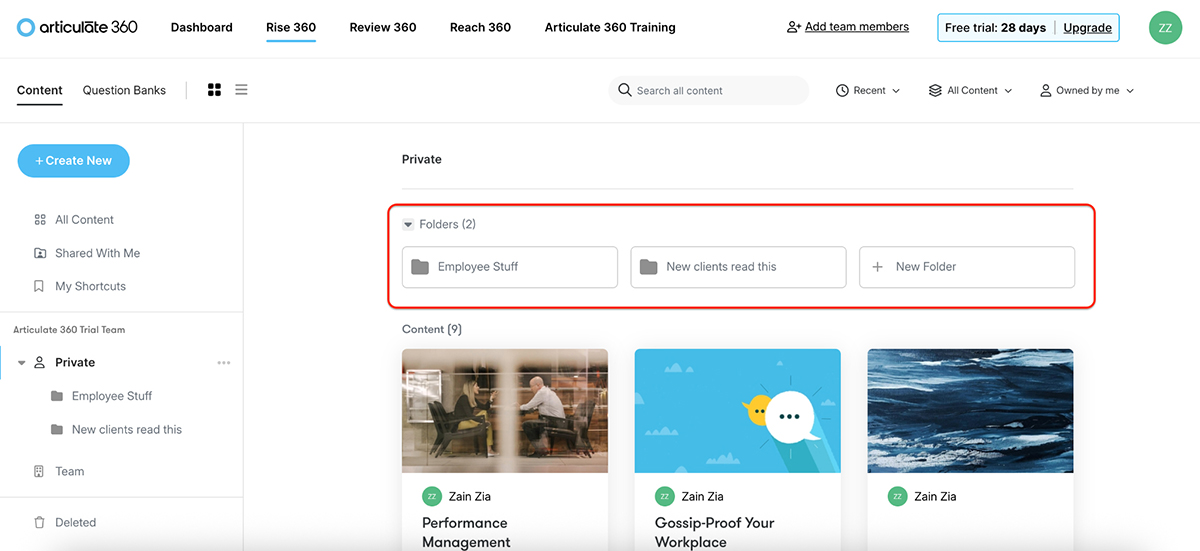
Everything you create lives in a central dashboard, laid out as visual cards.
From there, you can filter by All Content, Shared With Me, or organize files using Private and Team folders. Files in Private are only visible to you, while anything in the Team folder is automatically shared with collaborators.
Similar to Visme, you can drag and drop cards to different folders.
Rise also lets you use “shortcuts” to bookmark specific courses. This is particularly helpful if you’re jumping between personal and team projects. And the best part is that it doesn’t affect file locations but gives you a quick way to access your most-used content.
To move a course, just drag it to a new folder or switch between Private and Team views. And when you make changes inside a lesson, updates go live instantly—no re-export needed unless you’re syncing with an LMS.
If you're using Storyline 360, course management works differently.
Since it's a desktop tool, projects are managed locally or through Review 360 for feedback. You’ll need to republish to apply updates, especially if content is hosted in an LMS.
It’s more manual, but it offers version control and works well for structured review cycles.
Both Visme and Articulate 360 offer built-in AI features to speed up content creation. Let’s break them down:
| Visme | Articulate 360 (Rise) | |
| Create with AI | Yes | Yes |
| AI Writer | Yes | Yes |
| AI Image Generator | Yes | Yes |
| AI Editor | Yes | Yes |
| Text-to-Speech | Yes | No |
| Touch-Up Tools | Yes | No |
| Auto Resize | Yes | No |
| Brand Wizard | Yes | No |
Visme has tons of AI tools that help you speed things up without sacrificing design quality.
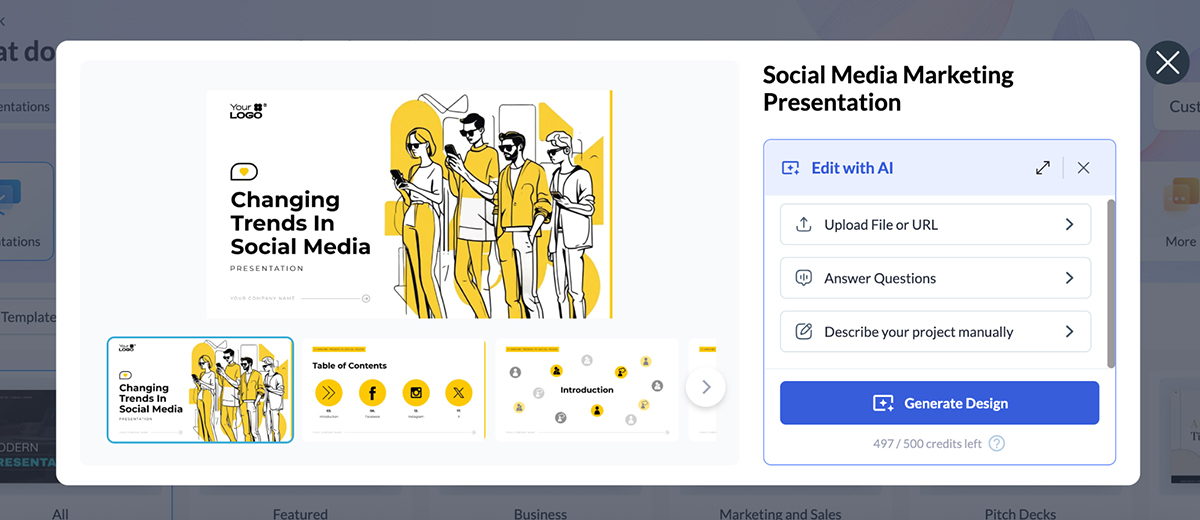
Once inside your dashboard, click on “Create with AI,” and this pop-up appears.
You can describe the kind of design you want, your topic, use case or layout preference, and Visme’s AI Designer will generate a completely original project with tailored content and visuals.
Let me show you how it works.
Prompt:
Generate a presentation for a corporate sales team on “Mastering the Discovery Call.”
Result:
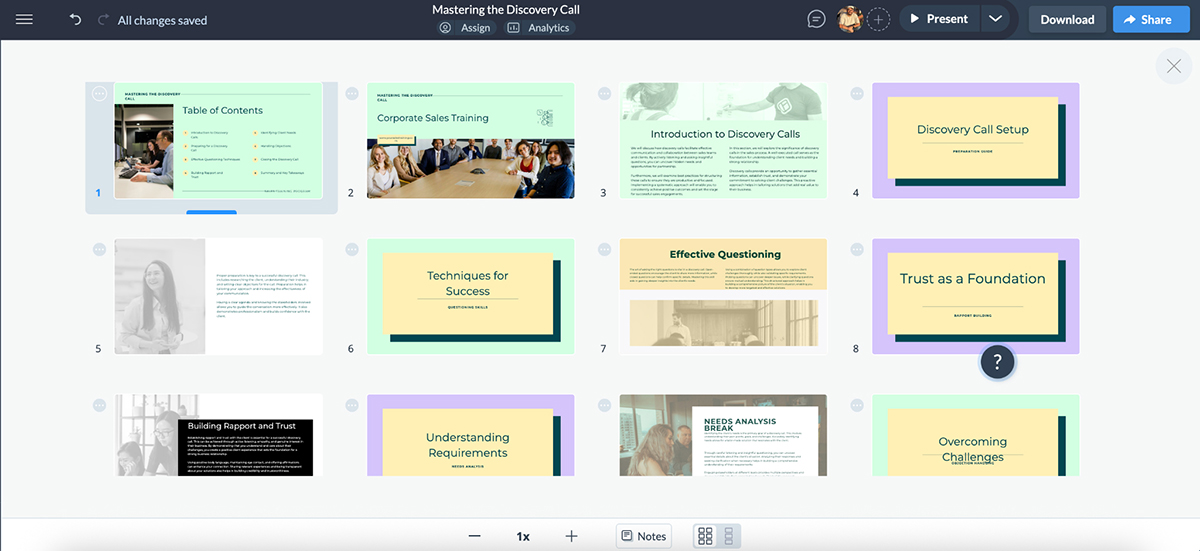
This looks terrific, especially considering it took under two minutes to generate.
That said, it definitely needs a few tweaks. The structure is there, but some of the text looks out of place and there are minor visual hiccups. Luckily, everything’s easy to clean up with a few clicks in the editor.
Moving inside the editor now. Visme keeps all its AI tools organized under the AI Hub.
Here’s what’s inside:
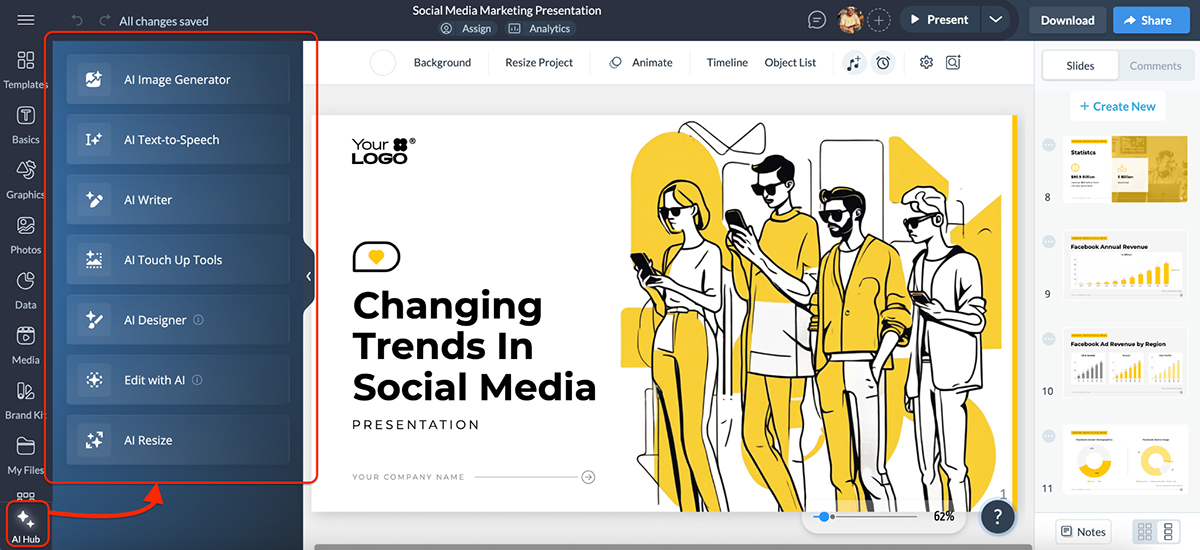
You also get the option to “Edit with AI” here. This helps you improve existing projects by:
I tried the Answer Questions route. Here’s what it asked me:
All these questions are relevant to the project I’m working on. So good.
One of Visme’s most underrated AI tools is the Brand Wizard. Paste in your website URL, and it pulls your fonts, logo and brand colors, then applies them across your designs. I use this all the time to keep everything on-brand, from client decks to training content.
If your workflow depends on visual storytelling, consistency and speed, Visme’s AI suite delivers exactly what you need.
Most of Articulate’s AI tools are currently available in Rise 360.
Let’s start with Create with AI.
From your dashboard, click Create New → Course → Start with AI, and you’ll be taken to a short questionnaire that kicks off your AI-assisted build.
Here’s what it asked me:
Q. What’s your course about?
Effective Remote Team Management for First-Time Managers
Q. Who’s your target audience?
Newly promoted managers leading remote or hybrid teams across departments
Q. Any specific learning objectives?
Understand the core principles of remote team communication, learn how to set expectations, track performance remotely, overcome common challenges and build trust without micromanaging.
It also asks if you want to upload any documents as source material to reference. But I didn’t upload anything.
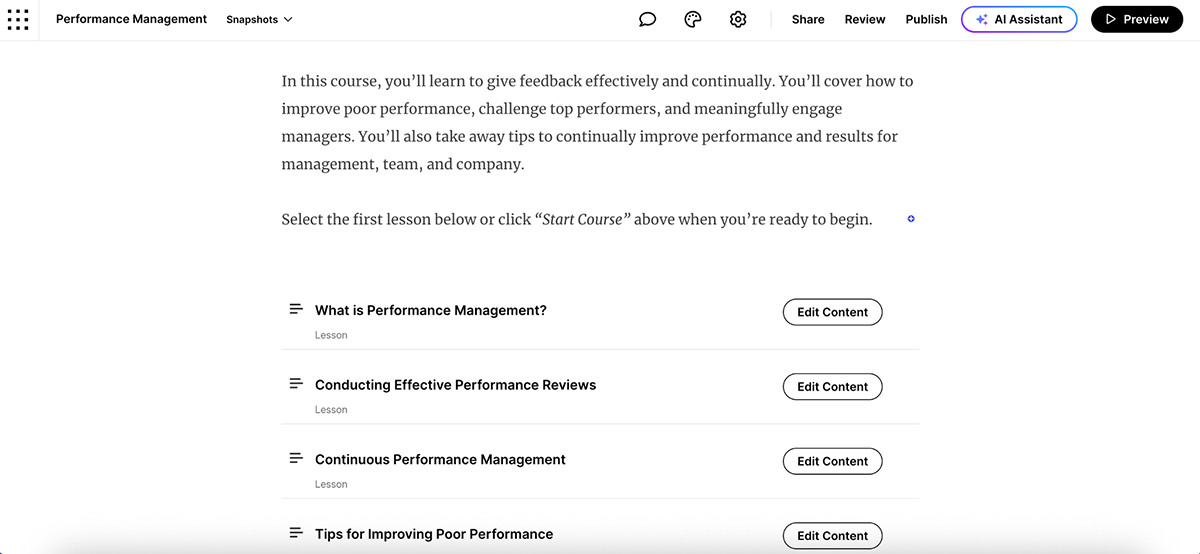
Based on those answers, Rise generated a full course outline—titles, descriptions and structured lessons—all within a minute.
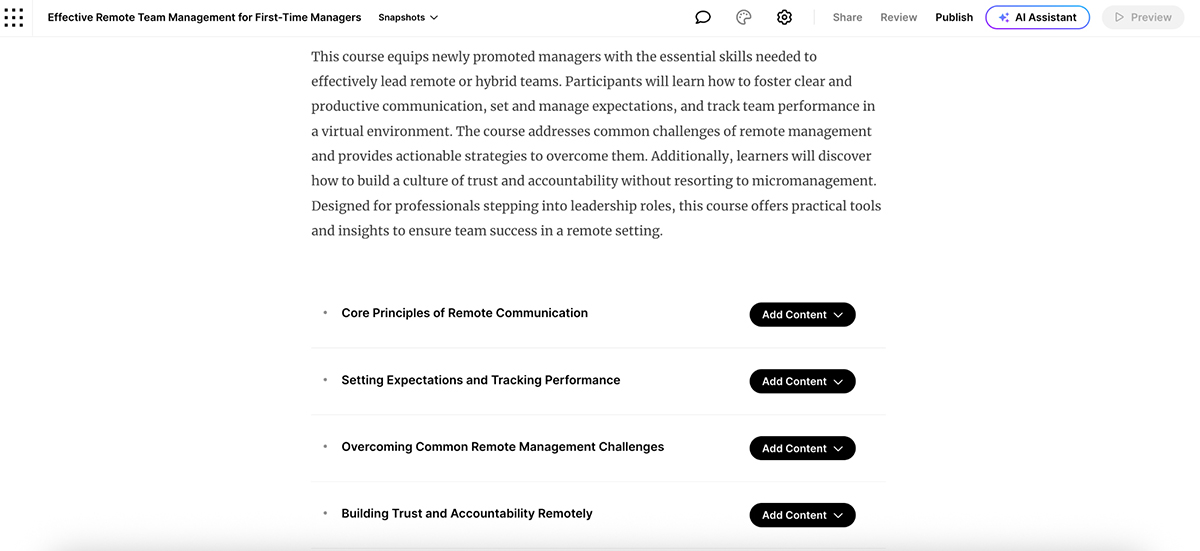
Note: It’s not yet a complete course. You’ll still need to go in and build each lesson. But there’s AI for that, too.
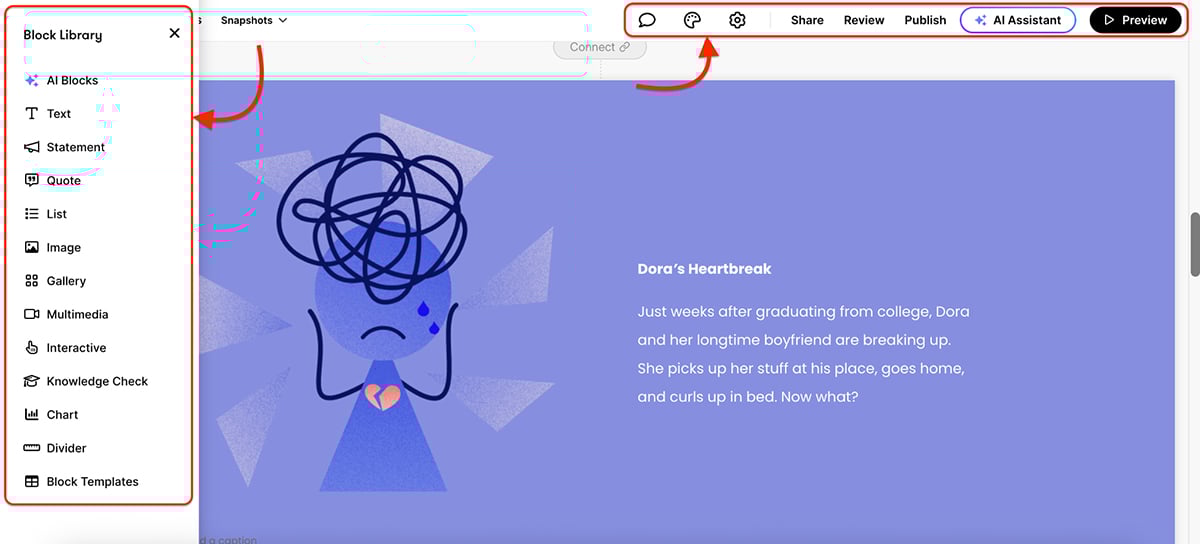
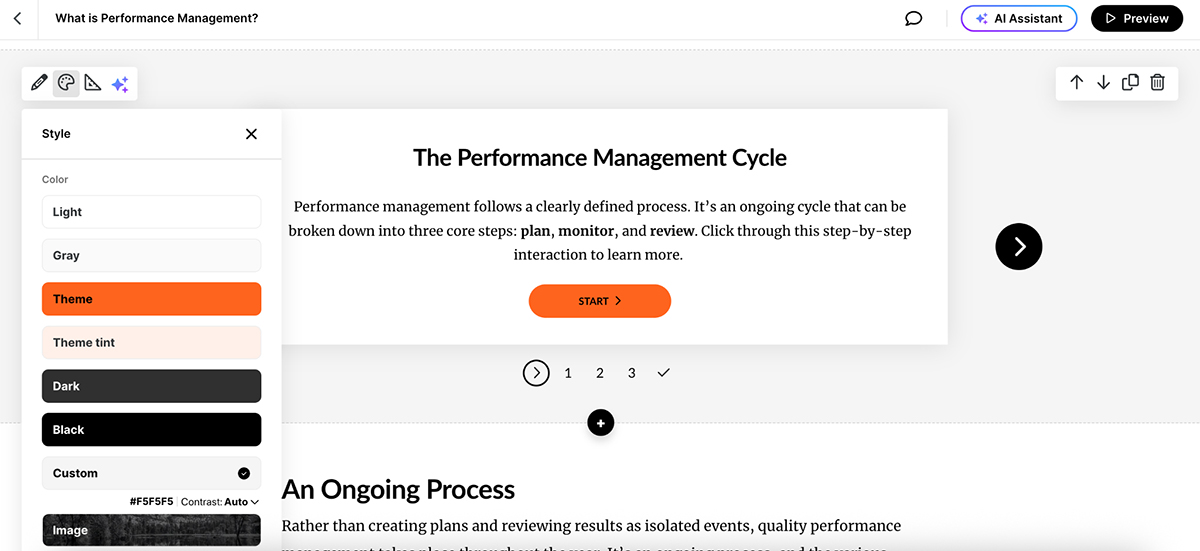
Once you're editing a lesson inside the editor, Rise gives you an AI Block Generator that can create a variety of content blocks instantly, including paragraphs, statements, lists, accordions, tabs, process steps, sorting activities, flashcards and tables.
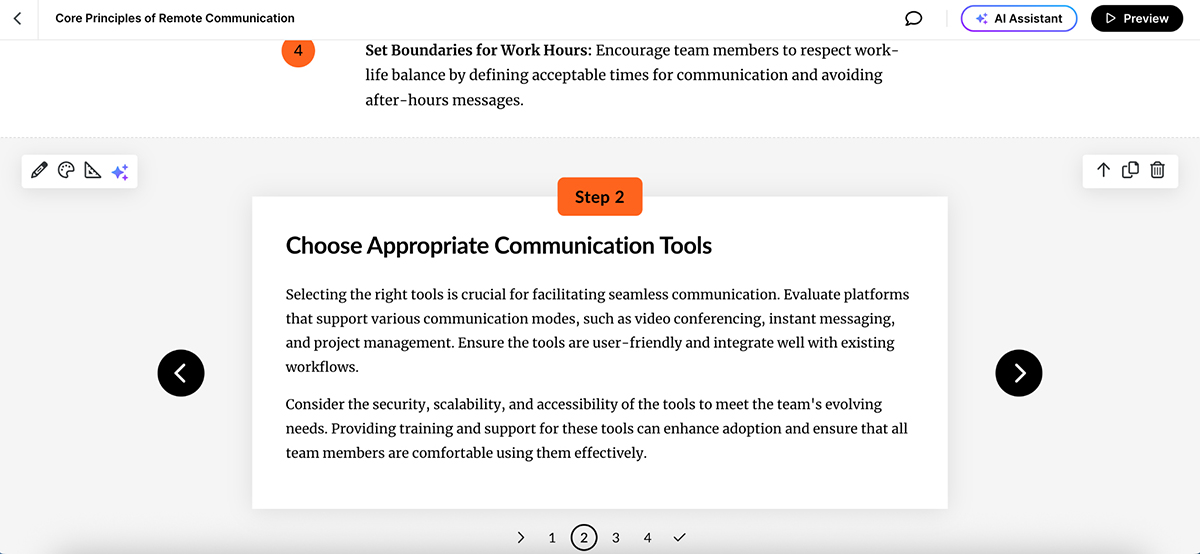
Not only is it fast, but the quality of the content it generates is surprisingly good. I was able to generate entire sections in minutes.
Other AI features of Articulate 360 include:
Storyline 360, however, does not currently include any built-in AI tools. All logic, layout and content are user-driven, which gives you full control but no automation.
If your goal is to move fast and build polished microlearning, Rise’s AI tools are solid. If you need precision and advanced interactivity, Storyline still relies on manual creation.
Brand consistency matters, especially if you’re building training content at scale or across teams. Here’s how each platform handles brand control and asset management.
| Visme | Articulate 360 | |
| Dedicated Brand Kit | Yes | Not available in Rise & Storyline |
| Reusable Branded Elements | Brand assets + custom themes + templates | Save custom blocks in Rise; Use slide masters and themes in Storyline |
| Logo & Font Control | Apply brand fonts and logos across projects | Manual in Rise; Theme fonts in Storyline |
| Brand Consistency Tools | Brand Wizard + multi-format support | Custom blocks in Rise; Style templates in Storyline (manual setup) |
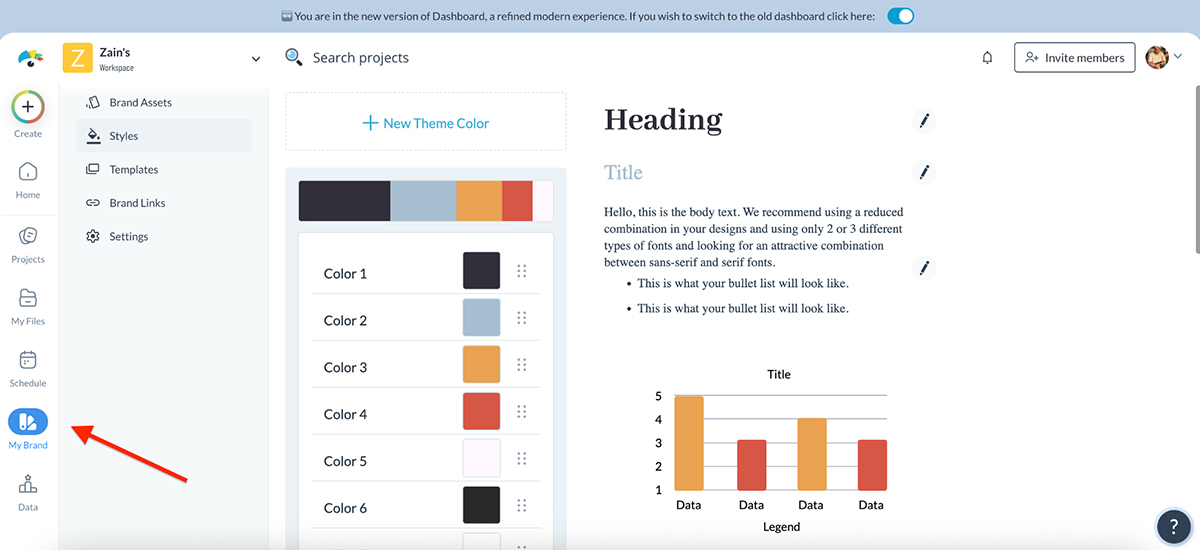
Visme makes brand management refreshingly simple.
Inside your brand kit, you can store your company’s fonts, colors, logos, templates and even branded assets like icons or images. Everything is saved in one place, and once it’s set up, it’s automatically available across all your projects.
So instead of manually styling each slide or re-uploading your logo every time, Visme lets you apply your brand look with just a click.
I especially like the flexibility here:
If you’re building content for clients or managing multiple brands, you can also create multiple brand kits within the same account. Huge time-saver.
Rise 360 doesn’t have a formal brand kit feature.
But there is a practical workaround: custom block templates.
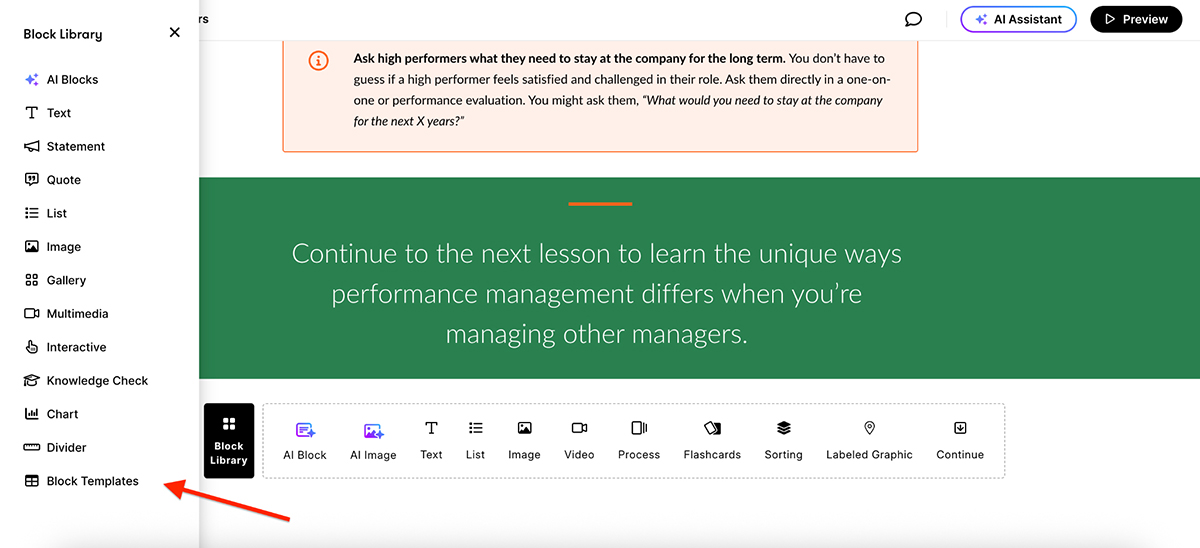
If you’ve created a branded section—say with your logo, font styling, header image and layout— you can save that block as a template. Later, you can insert it instantly into any course or lesson from your Block Library, already styled to match your brand.
This approach works well if you want to reuse branded intros, quote styles or headers across multiple projects. It’s not as seamless as a proper brand kit, but it gets the job done.
Storyline 360 also doesn’t include a built-in brand kit, but it supports slide masters, theme fonts and color themes that you can save and apply across multiple projects.
These tools help maintain brand consistency, but they require more manual setup than Visme’s one-click application.
So while Articulate gives you ways to reuse styling, Visme offers a more complete, built-in solution for branding at scale.
If you’re building content for formal training environments, LMS compatibility is essential.
Here’s how both platforms handle SCORM, xAPI and LMS export options:
| Visme | Articulate 360 | |
| SCORM Support | Yes (SCORM 1.2 and 2004) | Yes (SCORM 1.2 and 2004) |
| xAPI Support | Yes | Yes |
| Built-in LMS | No | Yes (Reach 360) |
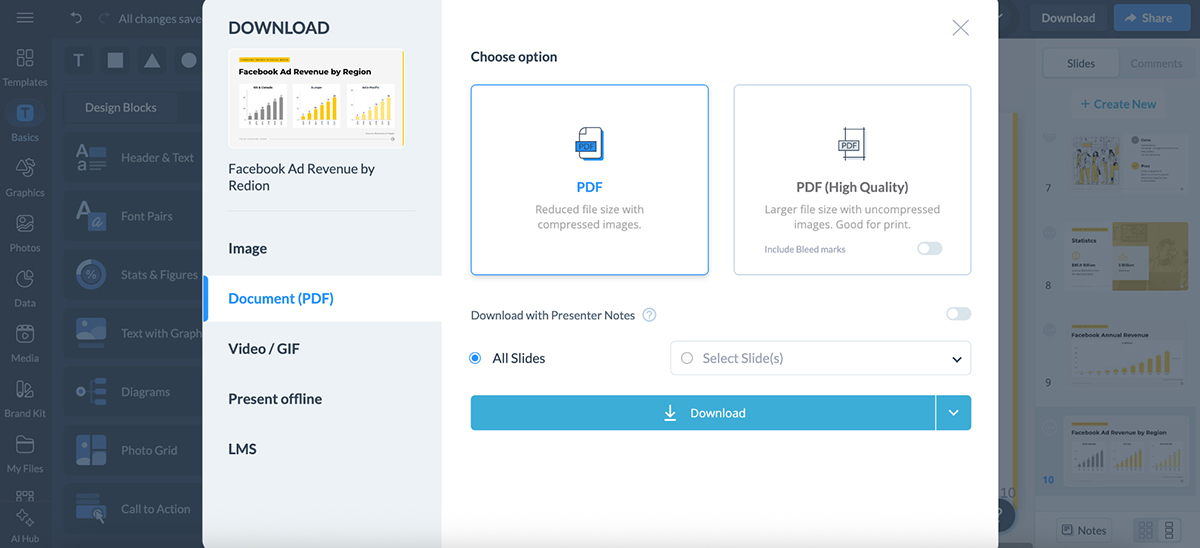
Visme supports both SCORM and xAPI export formats, which means you can easily export your training content and upload it to any compatible LMS.
You can choose between SCORM 1.2, SCORM 2004 or xAPI—and even enable bookmarking, so learners can pick up right where they left off.
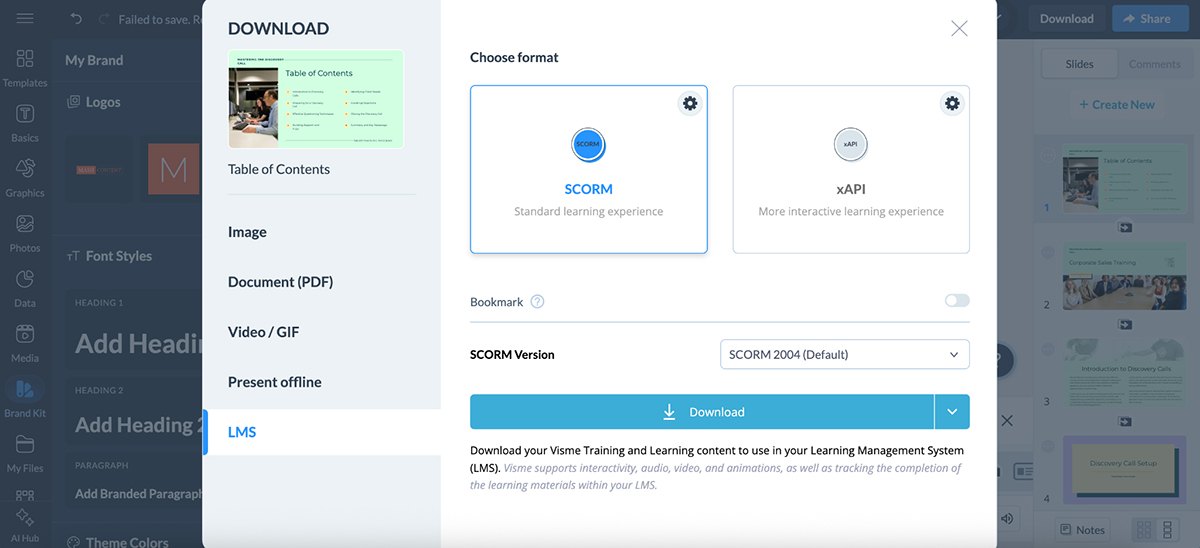
Before downloading, you also get access to a range of LMS-specific settings to control how your content appears and behaves inside the LMS. These include options for:
In short, if your goal is to deliver branded, interactive content through a SCORM or xAPI-compatible LMS, Visme makes the process simple and effective.
Both Rise 360 and Storyline 360 offer robust LMS export options. You can publish courses in: SCORM 1.2, SCORM 2004, xAPI, cmi5 and AICC
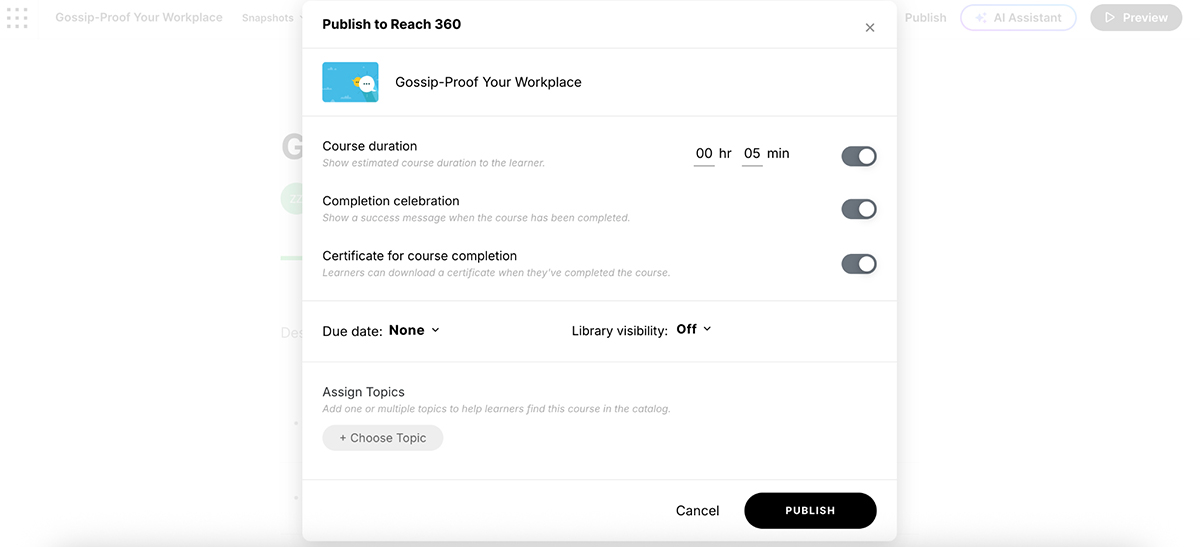
In Rise, you can toggle settings like completion tracking (Passed/Incomplete, Complete/Incomplete), enable an exit button and decide whether to reset learner progress.
Storyline gives you even more control over LMS tracking and reporting, including custom result slides, quiz scoring rules and detailed success/completion status settings.
It also supports advanced reporting triggers, which are useful for compliance-focused or certification-based training.
And if you don’t have an LMS, Articulate also includes Reach 360, a lightweight built-in LMS where you can host, share and track courses with minimal setup.
Whether you’re delivering structured microlearning or complex logic-based training, Articulate gives you solid options for LMS compatibility across the board.
When you’re working with others, whether it’s internal teams or external stakeholders, your tool needs to support efficient collaboration.
Here’s a quick look at how Visme and Articulate 360 compare when it comes to team workflows and user management:
| Visme | Articulate 360 | |
| Real-Time Collaboration | Yes (edit, comment, view in real time) | In Rise; Not in Storyline |
| Roles & Permissions | Admin, Editor, Viewer | In Rise (Author, Reviewer); Storyline relies on file-based access |
| Shared Workspaces | Yes (separate teams and brands) | Private/Team folders in Rise; Not applicable in Storyline |
Collaboration across teams in Visme is super easy. You can invite others to your workspace, assign roles (admin, editor, viewer) and create team folders to organize work. Real-time collaboration is fully supported.
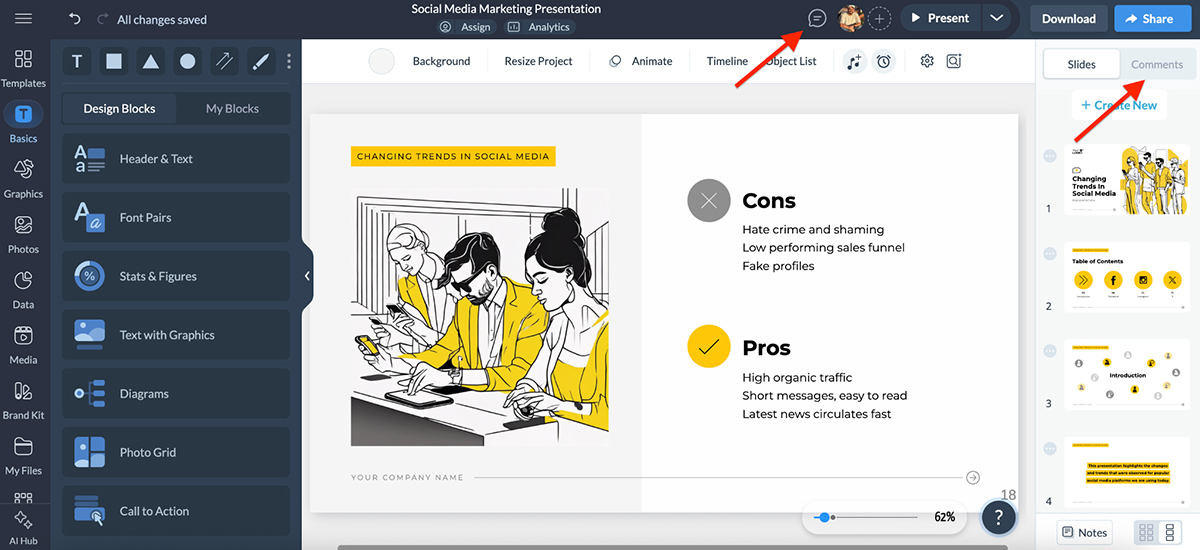
You and your teammates can edit a project simultaneously, leave comments and see updates live, just like you would in Google Docs.
Just click on the comment button at the top of your editor to leave or respond to comments. And to add collaborators, just click on the “+” icon.
I use this all the time when I’m co-building training decks or need feedback from clients.
You can also duplicate a project to spin off different versions or assign specific projects to certain teammates without giving them access to your entire workspace.
It’s a smooth experience overall, especially if you’re working on multiple brands or departments. You can even create separate workspaces for each group—love it.
In Rise 360, collaboration is built in. You can:
It’s fast, intuitive, and ideal for asynchronous team workflows.
Storyline 360, on the other hand, doesn’t support real-time collaboration.
It’s a desktop-based tool, so team members must share .story files manually or upload versions to Review 360 for feedback.
This setup works well for formal review cycles but lacks the live co-editing flexibility of Rise or Visme.
If you’re looking for dynamic, in-editor collaboration, Visme or Rise will serve you better. But for teams with structured review processes or version-controlled workflows, Storyline fits right in.
Creating great content is one thing. Getting it out into the world—shared, reviewed, and delivered where it needs to go—is another.
Here’s how Visme and Articulate 360 stack up:
| Visme | Articulate 360 | |
| Share via Link | Yes | Yes |
| Embed on Web | Yes | No |
| Download Formats | PDF, MP4, GIF, HTML5, SCORM, xAPI | SCORM, xAPI, cmi5, AICC (for LMS delivery only) |
| Live Updates | Yes | Yes |
Visme gives you a ton of flexibility when it comes to sharing and publishing your work.
Once your project is ready, you can:
What I really like is how easy it is to update a live project. If I make changes to something that’s already shared, I don’t need to re-export or resend the file. I just hit update, and the existing link reflects the latest version instantly.
That makes a huge difference when you’re working in fast-moving teams or refreshing training decks on the fly.
It also comes in handy for version control when you’re juggling multiple stakeholders, client feedback or last-minute edits. Everything stays centralized and up to date.
Rise also makes it easy to publish and share your courses. Once your course is ready, you can:
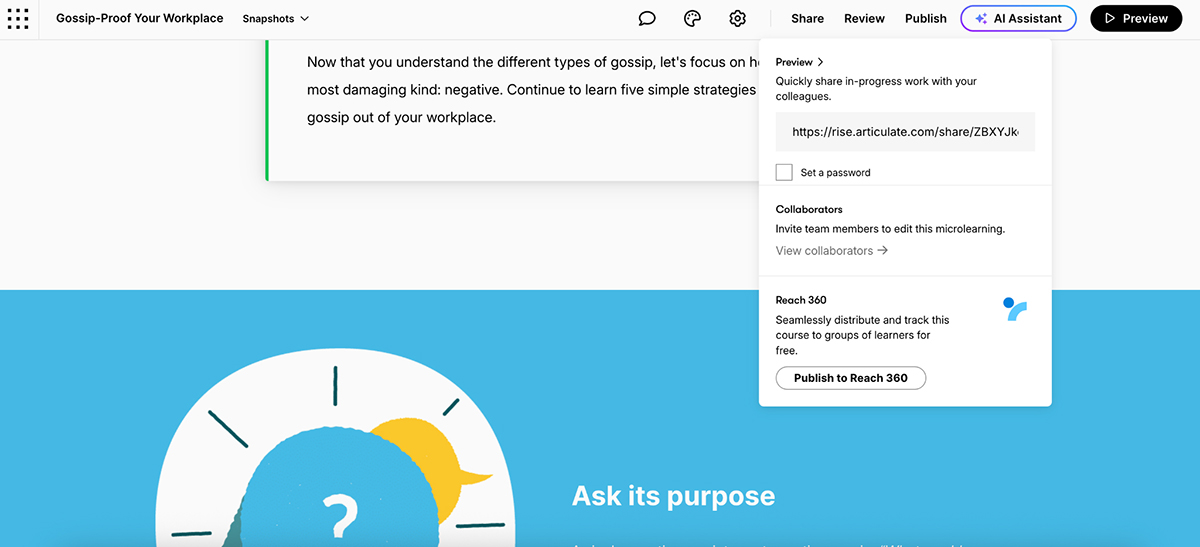
You can customize export settings, track completion, and configure learner progress/reset options.
Storyline 360, however, takes a more traditional approach.
Once you build your course, you need to export it manually, typically as SCORM or xAPI, and upload it to an LMS.
You can also publish to Review 360 for internal feedback, but there’s no live web link or embed option. It’s ideal for finalized courses, not for real-time sharing or quick iteration.
No matter how easy a tool is to use, you’re going to hit a question, need a how-to, or want to level up your skills. That’s where support and resources come in.
Here’s how Visme and Articulate 360 compare:
| Visme | Articulate 360 | |
| Help Center & Tutorials | Yes | Yes |
| Live Support | Yes—chat support + onboarding calls | Email-based support + ticketing |
| Webinars & Training | Regular | Regular |
Visme offers solid support across the board. There’s a searchable help center with step-by-step guides, onboarding videos and walkthroughs for nearly every feature.
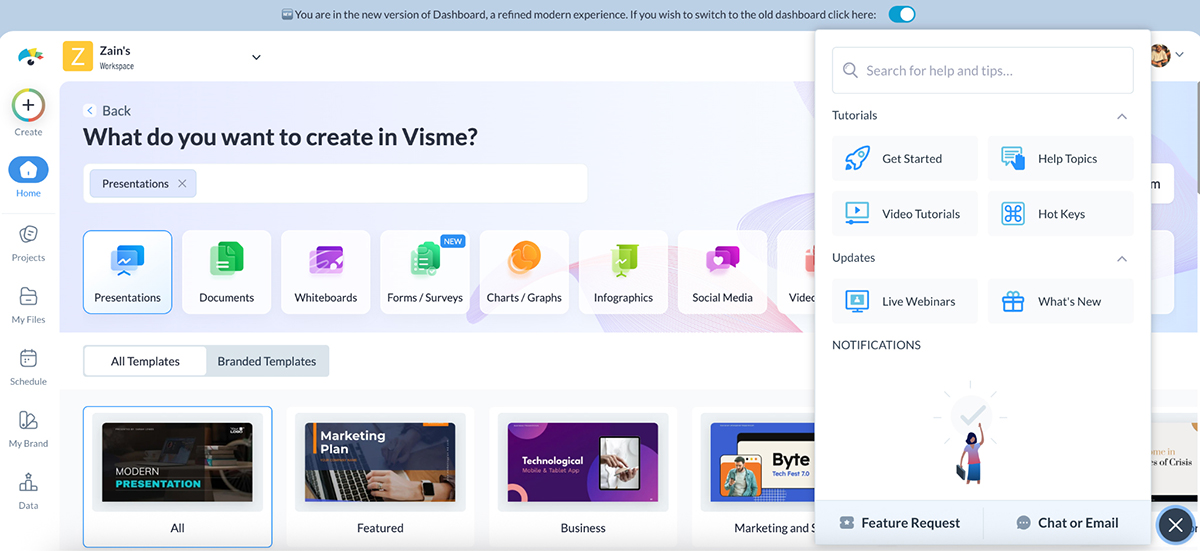
Just click on the “?” on the bottom-right of your screen and you’ll be able to access Visme’s CS team or solve the issue yourself.
You also get personalized onboarding calls if you’re managing a team.
Webinars are hosted regularly and cover everything from getting started to using advanced features like AI tools, brand kits and SCORM exports.
While there’s no public creator community, most users won’t need one. The tutorials are clear, the editor is intuitive and the support team is quick to respond if something’s off.
This is where Articulate really leans into its roots as an L&D platform. Their E-Learning Heroes community is a huge resource.
Inside the dashboard, click on “Articulate 360 training” at the top of your screen. And you’ll be taken to a new page.
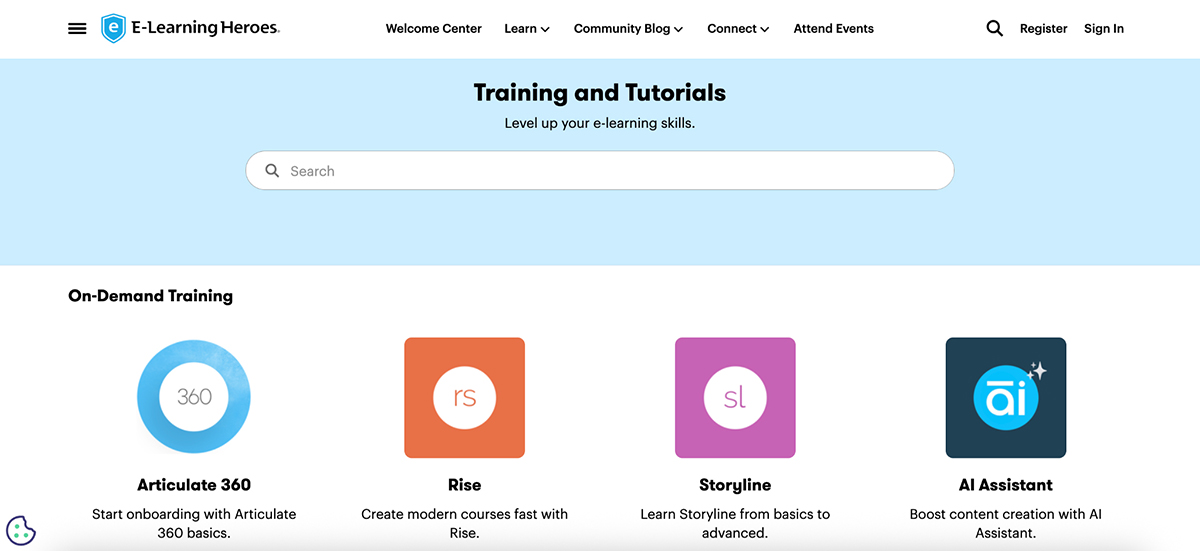
Here you’ll find templates, tutorials, real-world course examples, design critiques and peer-to-peer feedback. If you’re in corporate training or instructional design, you’ll feel right at home.
Beyond the community, you’ve got a robust help center, regular webinars and product updates, plus a deep library of “how to build this” style content.
You won’t find live chat here (support runs on email and ticketing), but the documentation is thorough enough that you rarely need to wait.
When you’re building training content, it’s not just about the tool, it's about the ecosystem that supports it.
What kind of templates do you get out of the box? Can you find real examples from other creators? Are there design best practices, inspiration and expert resources baked into the platform?
Here’s how Visme and Articulate 360 compare:
| Visme | Articulate 360 | |
| Design Inspiration | Business-focused template library for presentations, docs, etc. | Course examples from L&D professionals in the E-Learning Heroes hub |
| Learning Community | Resource-rich blog, webinars, and tutorials | Strong peer network for feedback, ideas, and troubleshooting |
| Templates for Training Use Cases | Available | Available |
Visme doesn’t have a formal design community, but it does offer a massive library of templates and visual assets across formats—presentations, infographics, documents, videos, forms and more.
While not every template is training-specific, many work well when adapted for learning use cases. The platform also provides webinars, blog tutorials and design tips that help you build more engaging, polished content without needing design experience.
Through Articulate’s E-Learning Heroes community, you get access to real examples, peer feedback, weekly challenges and templates built by and for instructional designers. If you’re creating training full-time or part of a formal L&D team, this kind of community support can be a huge advantage.
Visme and Articulate 360 are priced for different audiences, and the gap is pretty significant.
Here’s a quick breakdown:
| Visme | Articulate 360 | |
| Free Plan | Yes | No |
| Starting Price | $12.25/month (billed annually) | $1199/year |
| Plan Structure | Tiered – unlock more features as you go | All-in-one flat pricing |
Visme is priced to grow with you.
You can start on a free plan, which includes access to basic templates, limited storage and essential design tools. Then scale up to a Personal or Business plan as your needs evolve:
I’m on the business plan, and for the level of interactivity, design freedom and built-in AI tools you get. It’s a great deal, especially if you’re trying to create training content without depending on a separate designer or dev.
And real teams have seen that value firsthand.
WOW!, a training and development team, reported saving nearly 79% in time and cost by using Visme’s intuitive graphic design tools.
Whereas Vanessa from Vorys says:
“If employees in the three departments were billed at $30 an hour by a designer, we would have saved 22 hours of work in July alone by using Visme instead of starting from scratch. Over a year, that translates to more than $8,000 in savings, thanks to the time saved when we compare starting from a blank sheet of white paper versus starting from Visme.”
Articulate 360 is a premium suite, and its pricing reflects that.
You don’t get a free plan, but the paid subscription gives you access to everything in the suite: Rise 360, Storyline 360, Review 360, Content Library, Reach LMS and more.
It’s definitely an investment, but for L&D departments and professional course creators, it can be worth it if you need Storyline's advanced logic, community resources and LMS compatibility out of the box.
Both Visme and Articulate are beginner-friendly, but in different ways.
Visme is easier for non-designers or general users. You can jump in, pick a template and start building without training.
Articulate 360, especially Rise, is also simple to use thanks to its block-based layout, but tools like Storyline come with a steeper learning curve suited to experienced instructional designers.
Not permanently. But Articulate 360 offers a 30-day free trial that gives you access to the entire suite, including Rise, Storyline and Review.
No. Articulate 360 is an authoring tool suite, but it offers LMS-compatible exports (like SCORM and xAPI) and includes Reach 360, a lightweight course delivery platform.
Yes. A subscription to Articulate 360 includes Storyline 360, which is the more advanced, slide-based authoring tool for building custom, scenario-driven learning.
Tools like Visme and Adobe Captivate offer comparable features for creating interactive, LMS-ready training content.
Yes. Visme supports SCORM and xAPI exports, so you can upload content to any LMS that supports those formats.
If you need structured course authoring, Articulate is great. But if you’re looking for visual freedom, interactivity, and lower cost, Visme is a better fit for many teams.
For dedicated L&D teams, yes. Its combination of Rise, Storyline and community support makes it a strong choice for building formal training programs.
It depends. Articulate is great for structure, Captivate for simulations and Visme for interactive, branded content with easier design tools.
Want to see how Adobe Captivate stacks up against Articulate 360? Click here to read more.
Yes. Visme offers a free plan with basic features and templates and paid plans start at $12.25/month with advanced functionality.
If you’re building structured, LMS-driven courses and need features like advanced testing logic or scenario-based training, Articulate 360 (especially Storyline) is hard to beat. It’s built for traditional eLearning teams, and it delivers on that promise.
But if you care more about visual freedom, interactive storytelling, branded design and price, Visme is clearly the better pick.
You’re not locked into rigid layouts. You don’t need a separate design team. And you don’t have to compromise on how engaging your content looks or feels.
From drag-and-drop editing and responsive quizzes to AI-powered tools and SCORM/xAPI support, Visme gives you everything you need to build training content that’s dynamic, scalable and on-brand—without the enterprise price tag.
Plus, there are tons of other use cases of Visme for content creation.
If you’ve read this far, I hope this guide helped you figure out which platform fits your needs best. And if you’re leaning towards Visme, get started for free—no credit card needed.
Design visual brand experiences for your business whether you are a seasoned designer or a total novice.
Try Visme for free


![How to Create a Practical Crisis Management Plan [+ Templates]](https://visme.co/blog/wp-content/uploads/2025/07/How-to-Create-a-Practical-Crisis-Management-Plan-Thumbnail.png)