


A Quick Guide on Sponsorship Marketing: Best Framework, Examples & Tools


In this era of ever-evolving trends, technology and buying preferences, brands need to continuously know and anticipate the needs, motivations and actions of their customers.
And that’s where a customer journey map comes in handy.
By visualizing each step your customer takes from the moment they encounter your brand to when they make a purchase to how they react afterward, you’re able to deliver memorable customer experiences, drive more sales and improve your business processes.
In this article, you’ll learn what a customer journey map is, why you need one and how to build a customer journey map that helps you achieve your goals.
We’ve also included examples and templates along the way so you can easily create a customer journey map for your own business.
Let’s get started.
Ready to build your own customer journey map? Use our infographic maker that comes built-in with professional templates to create a digital customer journey map you can download, share or embed online.
Here’s a short selection of 8 easy-to-edit customer journey map templates you can edit, share and download with Visme. View more templates below:


A customer journey map is a visual representation of how a customer moves through the different stages of interaction with your brand.
The best customer journey maps are detailed and granular, and help you grasp the customer experience each step of the way.
Here’s a customer journey map example for an online course website.

Instead of providing a bird’s eye view of the overall buying process, customer journey maps also take into account how a customer feels, what actions they take and what obstacles they face at each touchpoint.
Below are some elements typically included in a customer journey map:
While the elements above are found in most customer journey maps, there’s no set format you need to follow. Every brand has a unique map with distinct stages and touchpoints, depending on the purpose of the map, target customers and nature of the business.
Also, customer journey maps aren’t always used for visualizing the buying process. You may also want to create journey maps to visualize the sales process or onboarding process, for example.
You can also create more specific maps for processes like returns and refunds, cancellations, creating a support ticket or how a customer navigates through your website.
Creating a customer journey map can be incredibly useful for any business.
Along with the obvious benefit of providing you with insight into the customer experience in detail, customer journey maps can also improve your business’s profitability, scalability and growth in the long term.
Below are some major benefits of mapping out the customer journey for your business.
First and foremost, customer journey maps help you see things from your customer’s point of view. When you better understand your target buyer, you’ll be able to create and implement more relevant inbound marketing strategies.
This will ultimately result in an influx of inbound leads, and will greatly reduce the costs and resources that go into outbound marketing.
Inbound leads are potential customers who proactively seek out your business because they feel it will solve their problems. Outbound leads, on the other hand, are potential customers that businesses reach out to first, and these people may or may not be interested in buying your products or services.
Pro Tip: A big part of inbound marketing is creating relevant and engaging content. With Visme, you can create, share and analyze all kinds of branded content, from infographics to eBooks to videos to social media graphics — no design skills needed!Compared to outbound leads, inbound leads offer tons of advantages. These people have actively shown interest in your product, and cost much less to acquire.
Plus, inbound leads are more likely to trust your business as you’re not shoving salesy messages or interruptive ads down their throats.
Bad experiences can cost your business more than you’d think.
According to PwC, 1 in 3 customers will walk away from a brand they love after just one bad experience. If you want to retain existing customers as well as acquire new ones, you need to constantly deliver amazing, frictionless customer experiences.
How? With customer journey mapping, of course. Only when you understand the pain points, obstacles, questions and overall journey of your customers will you be able to make the transition from one step to another as seamless as possible.
By visualizing the needs, feelings, actions and buying process of your customers, you’re able to identify gaps and opportunities to improve customer experience at every touchpoint.
Customer journey mapping helps you improve your internal and external business processes, which results in less friction at each customer touchpoint. This results in more customers finishing their purchases as they progress seamlessly through the buyer journey.
For example, you may find that your checkout process is long and cumbersome, and is causing a lot of shoppers to get frustrated and abandon their carts. By implementing a faster checkout process, you’ll be able to reduce the number of abandoned carts and convert more customers.
Think of it like a bridge. The easier you make it for potential customers to progress through the bridge, the more likely they’ll be to reach the other side (i.e. convert into customers.)
However, if there are a lot of obstacles along the way, potential customers may turn back and take another route to get to their final destination (i.e. buy a competitor product.)
A big advantage of creating customer journey maps is you get to identify granular-level problems and frustrations that your customers are experiencing with your product.
This helps you create products or features that actually solve a problem and fit into the customer journey. The result? More successful product launches.
Here’s a customer journey map example from Spotify that helped with adding a new sharing feature to the music streaming app:
Spotify’s customer journey map was used during the research phase, even before the design or development of the sharing feature. It helped the UX designer learn more about the motivations and pain points of Spotify users, and create a feature that they’re likely to adopt.
Customer journey maps aren’t just useful for marketing purposes. They’re also great tools for clarifying the roles and responsibilities of different departments, managers and team members.
For instance, your customers may be getting bounced between the support, marketing and product teams after a complaint. By creating a journey map, you’ll be able to pinpoint the exact problem and streamline the support process so there are no bottlenecks caused by blurred lines of responsibilities.
Building a customer journey map can also help you save costs and direct time, energy and resources into things that actually contribute to the growth of your business.
For example, you may find that most people first spot your brand via Facebook and Instagram. This information will help your marketing manager understand which platforms to focus on most. It will also be useful when you’re planning your annual social media marketing budget.
Last but not least, customer journey maps can help bring all business departments and teams on the same page. Journey maps are usually created in the form of shareable, visual documents, and are typically shared with all employees across the business.
This means that teams from all departments are able to see exactly how customers interact with a brand, what they feel and what their pain points are. From production to marketing to customer service to finance, every team will now be able to set customer-focused goals based on the actual needs and wants of the customers.
This will result in a cohesive business strategy that puts the customer first, with teams in all departments working together to grow and scale the business in the same direction.
Now that you understand the various benefits of creating customer journey maps, it’s time to learn how to actually build one.
Creating a journey map is not difficult if you follow a systematic process. In fact, the more research, time and effort you put into your map, the more accurate it’s going to be.
Below are seven steps to building a customer journey map for your own business.
Before you start creating your customer journey map, you need to know why you’re making one in the first place.
If you don’t, you won’t know which areas to focus on, what problems to look for and how to use your map to its maximum potential.
Even worse, you may not know which customer journey to map out in the first place.
Ask yourself why you are creating this map.
You can jot down your goals using this SMART goals template and share it with your team during the brainstorming session:

The goal of your map will ultimately influence its creation process as well as the elements you choose to add to it. Setting objectives early on will also help you extract the right information from the map and make more focused decisions.
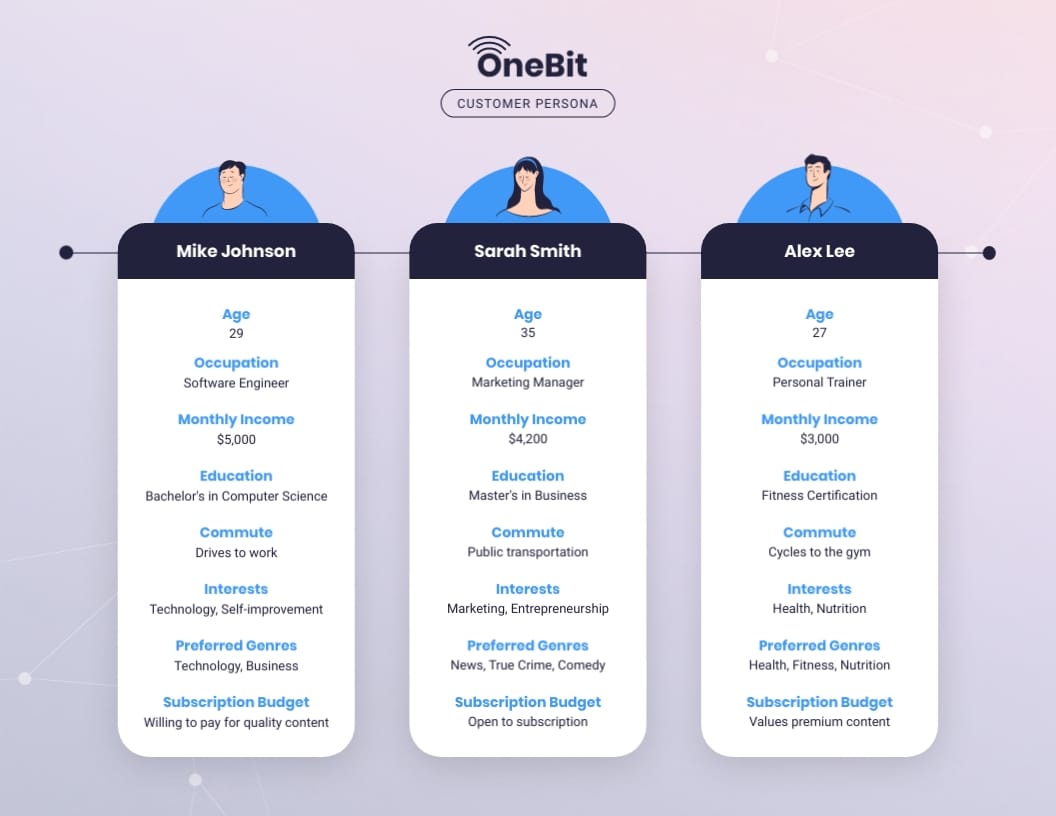
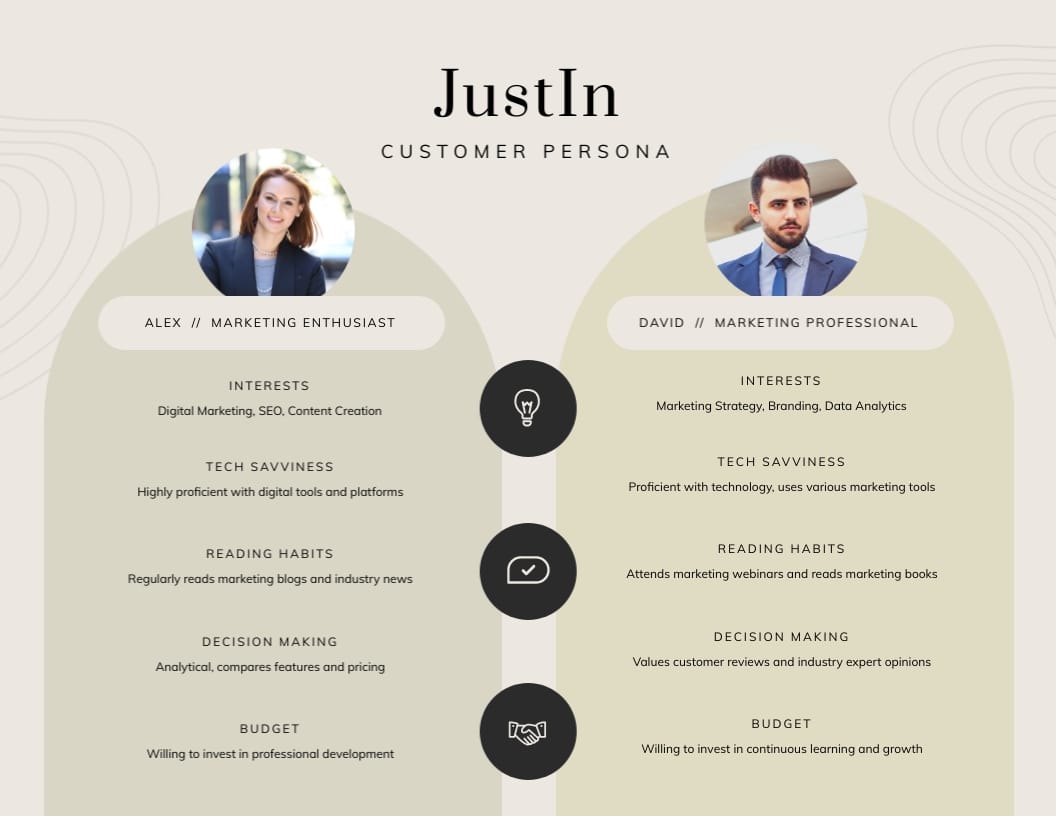
You can’t sketch out the customer journey if you don’t know who your customer is. Creating buyer personas is an essential part of the research phase that you’re now entering.
A customer persona is a document — often visual in nature — that captures the most common characteristics of your ideal customer.
For example, you may find that your most profitable customers are small business owners, male and aged between 30-40 years old.
By conducting more in-depth research, you can find more information on this type of customer, such as their job position, motivations, habits, lifestyle characteristics, income level, frustrations and professional skills.
Then, you’ll put together all of this data and create a profile of your target customer. You may also want to give this ‘person’ a fictitious headshot and name. This document is known as a customer persona.
Here are some user persona templates you can start using right away.
There are several ways to do research for your customer personas, such as by conducting surveys and talking to customers.
Below are some questions to consider adding to your surveys and feedback forms:
Other ways to collect customer data include looking at social media analytics, finding out who your competitors are targeting, practicing social listening, talking to customer service reps and many others.
Once you’ve collected data on your customer, it’s time to visualize the overall process of whatever journey you’re trying to map out.
For example, if you’re creating a customer journey map of how a website visitor converts into a paying customer, you might want to make a list of the key steps involved.
Similarly, if you’re creating a journey map of the onboarding process, you’d want to list down the series of steps that customers take as soon as they sign up for a trial or make a purchase.
This is important because you’ll organize these steps later into phases or stages, and associate various touchpoints with them. This takes us to the next point.
It’s almost time to sketch out your customer journey map. But before that, you need to make a list of the different customer touchpoints of your brand.
Touchpoints are all the channels, platforms, mediums and instances where customers come into contact with your brand at any stage in their customer journey.
The customer touchpoints of your brand can differ based on your business type and target audience, but they’re mainly classified into two groups:

Listing out all your customer touchpoints will give you insight into how, where and when your customers interact with your business.
In the next step, we’ll organize all of this information in the form of a customer journey map, and add various elements associated with each touchpoint and stage.
Now, it’s time to create your customer journey map.
The first step is to filter through your lists and organize the information that you’ve gathered into phases or stages. Preferably, you should visualize this in a timeline format.
Typically, a customer’s buying journey is divided into the following phases or stages:
Once you’ve narrowed down your customer journey stages, it’s time to expand on your map by adding the elements associated with each stage.
One of these elements would obviously be your customer touchpoints. At this stage, you may also think of new touchpoints you missed before, so add them to your list.
Whittle down your list and think about when your customers use each touchpoint. For example, you may find that customers read product reviews during the consideration stage, so that’s where you’ll add this information.
Or, you may find that the first interaction of customers with your brand is via a Google search or social media ads. You may want to add those touchpoints under the awareness stage.

Keep in mind that some touchpoints may overlap between different stages, and that’s perfectly okay. Customers may use one touchpoint multiple times during their journey but for different reasons.
This takes us to the next part: adding the actions, emotions and pain points associated with each stage or touchpoint.
Great customer journey maps often wander into the psychological aspects of the way customers interact with your business and complete their journey.
Consider adding the following elements to your customer journey map extracted from the customer information collected during the research phase:
These elements may or may not be associated with specific touchpoints or stages — it depends entirely on your unique map. Find a way to incorporate these elements into your map in a way that they make sense and reflect their influence on the customer journey.

For example, you can use icons to depict user reaction or mood at each stage, similar to how it’s shown in the template above.
Now that you have a draft ready, it’s time to share it with your team, and review and improve it until everyone is completely satisfied. You may also want to test out your customer journey map for accuracy purposes.
It’s a good idea to keep things non-digital at this stage so it’s easier to move things around, or add or remove information. However, if you feel comfortable using software, that’s fine too.
Finally, when you’re happy with your customer journey map, it’s time to create a digital version of it, and then download or share it online.
If you’re making your journey map in Visme, you have several options:
That’s it. Your customer journey map is ready to roll.
The steps above will help you create a customer journey map. But there are some tips and expert insights to know when creating and using your customer journey map so you can get the most out of your efforts.
Below are some best practices for customer journey mapping to keep in mind:
If you create a customer journey map and don’t use it to its max potential, you might as well burn it or throw it in the trash. It’s doing no good hanging on your office wall.
Go back to the goals you set in the first step, and identify gaps and opportunities in your map to help you achieve those goals.
For example, you may find that customers experience frustration when interacting with your support team. Or, you may find that there are too many steps that customers need to take before they can make a purchase, which may frustrate them and cause them to leave mid-purchase.
Identify these issues, brainstorm with your team and note down the solutions. More importantly, create a comprehensive project plan for implementing those solutions.
Here’s a project communication plan template you can use to share goals, solutions, implementation steps and timelines with your team:

You may also find that creating a ‘future state’ map and comparing it with your existing one is helpful for finding solutions.
A future state map is basically an ‘ideal’ customer journey map with minimal friction and pain points. It’s the journey your customers should be taking versus the one they’re currently taking.
It’s also a good idea to revisit your map before and after every significant change, product launch or feature release. It may impact the overall buyer journey and that needs to reflect in your map.
When building a journey map, it’s easy to start writing from your own point of view rather than the customer’s. This is also called the empathy gap.
To reduce the empathy gap and create a map that accurately represent’s your customer’s journey, you need to put yourself in your customer’s shoes — almost literally.
Go out and talk to your customers. Conduct surveys, collect feedback, analyze support tickets and even take the entire journey yourself. Another good idea is to talk to your customer-facing employees, such as customer service reps, salespeople and members of the support team.
Here's a survey template you can use to visualize results from your questionnaires and feedback forms. These are handy for sharing with your team.

Going directly to the source will help you gain insight into things that you can’t possibly learn from just sitting around a table with a bunch of employees.
If you feel that you’re still going to be a bit biased when creating a customer journey map, it might be helpful to enlist the help of a marketing agency.
While all stages are equally important, pay special attention to where the customer begins their journey and where it ends. This will depend on the ultimate goal of your map.
For example, if you’re visualizing the customer’s sales journey, you need to start from where they first encounter your brand. If you’re mapping out a customer’s onboarding journey, the starting point will likely be when they sign up for a trial or make a purchase.
Customer experiences aren’t created in isolation. And the same goes for customer journey maps.
A company’s buying process usually involves different customer touchpoints. Because of this, it’s helpful to build your customer journey map in collaboration with team members from multiple departments.
That said, we don’t recommend inviting every single person to contribute at first. It’s a good idea to gather 3-5 members from different teams initially who are qualified and knowledgable enough to provide insight into the customer experience.
Once you have a draft ready, you can run it by more people in your company for review and potential revisions.
If you’re creating your customer journey map digitally, it’s tempting to open your computer and start visualizing it right away.
However, that could quickly turn into a painful, time-consuming and frustrating process, especially when you have to make hundreds of revisions along the way.
One workaround is to prepare a draft by hand initially. You may also want to gather a handful of teammates and brainstorm on a board with paper notes or a marker.
Also, you can use Visme's online whiteboard software to brainstorm and make your meeting super productive. You can easily erase, revise and replace things on the tool, leave comments and vote on ideas.
Once you have the final draft ready, you can then digitize your map and create an attractive, virtual copy that you can share internally.
Finally, your business may have several different types of customers, each taking a unique journey with your brand.
Make sure you don’t create a single map for all customers, as this may result in you implementing strategies that are relevant to only some of your customers and not others.
If you’re a consultant, for example, you may serve both large enterprises and small, local businesses. However, it’s possible that large enterprises interact with your brand in a completely different way than small businesses do.
That’s why it’s best practice to create multiple buyer personas for each of your customers. Then, create a different, tailored map for each persona to accurately grasp the customer experience and improve it successfully.
Creating a customer journey map from scratch can be time-consuming and frustrating, especially if you’re not a designer.
Thankfully, you can use a premade template to skip the design and layout worries and speed up your map creation process.
Below are 10 fully editable customer journey map templates you can use for your own business.
This customer journey map is designed especially for e-learning platforms and online course websites.
You can easily customize this template for any other purpose or industry. It’s simple, professional and to-the-point, and covers all the basic elements that need to go into a journey map.
This gaming customer journey map template is created with recreational mobile apps in mind, but you can use it for any tech, SaaS or other industry.

It’s colorful, bold and visual, and you can easily add or remove stages, rows, columns, text, icons and other elements.
Use this fashion store customer journey map example for virtually any retail or e-commerce business. You can also customize it for other use cases.

This map specifically focuses on user actions and experiences. However, you can easily modify it by adding more columns and rows. You can also swap the background image for a more relevant photo, or even a solid color — right from inside Visme.
This customer journey map template is modern and engaging, perfect for a SaaS business, startup or a mobile app.

It’s designed in a longer, infographic style, and provides ample space to fit in your own unique content. You can add bullet points and more specific information within the sections provided, or use the same layout for your customer journey map.
This nonprofit customer journey map example is crafted for a more serious brand voice, but you can easily modify it in Visme’s infographic editor.

What stands out about this journey map template is that it has a space for describing the specific stage of the customer, which you can also use to write associated actions. There’s also a star rating row that can help sum up the customer experience at each stage.
Here’s another SaaS-focused customer journey map example that you can use for your business.

This customer journey example is simple and straightforward, and is useful for less complex journey maps that don’t have a lot of rows, columns and sections.
Looking for a travel customer journey map example? This template is great for both travel-related businesses, SaaS companies, technology businesses and mobile apps.

It organizes information in an easy-to-read, skimmable way, and there are designated spaces for adding touchpoints, stages, steps and a brief customer description.
This customer journey map example is created in an infographic style, which means it’s longer and has space for more information.

This type of customer journey map is highly engaging and can help all your employees grasp the message with a single skim-through. Edit it with your own content, colors, graphics and more, and download or share online.
This template is another infographic-style customer journey map. It’s highly visual and engaging, and is great for fitting in all your elements in a clean, professional way.

Customize this journey map template, add or remove content blocks, text and graphic elements, and even make it interactive by adding links and animations.
This is another infographic-style customer journey map template, but this one is geared more towards the fitness industry. However, it’s also a great design for SaaS and technology companies.

The highlight of this customer journey map is the large space dedicated to the customer persona. If you feel like you need a design that focuses on the customer’s traits and characteristics, this is an ideal template for you.
Customer journey maps are excellent tools for visualizing how your customer interacts with your brand, and how they feel about it at every step of the way.
This gives you valuable insight into how to improve their experience and make it seamless and satisfying, which will motivate them to keep returning to your business.
If you're ready to create your own customer journey map, check out Visme's customer journey map templates. You can easily customize them in our drag-and-drop editor, and even create a map from scratch using custom sizing and built-in graphic assets.
Other than customer journey maps, Visme also lets you build full-fledged marketing plans, presentations, infographics, videos and social media content. The best part is you can create a free account and take it for a test drive for as long as you like — no credit card required.
Design visual brand experiences for your business whether you are a seasoned designer or a total novice.
Try Visme for free