Best Interactive Content Examples to Inspire Your Next Project


Video is undoubtedly one of the best formats to present ideas, stories and experiences. Not only does it offer the most engagement and interactivity among all types of business communication, but it also gives you enormous room for creativity and flexibility.
Regardless of the type of video you choose to create for your brand, adding a voiceover can help you connect with your audience in a better way.
Just like animations can help grip the audience’s attention through imagery and movement, voiceovers give videos that extra bit of human touch that is lacking in most business videos.
In this article, we’ll share the components of a good video voiceover and highlight the 7 steps you can follow to easily record a professional voiceover for any type of video.
Let’s dive right in.
A good voiceover isn’t just about the voice. There are several things that go into a voiceover that makes it stand out from the rest. Here are some of the essential components you’ll find in any top-quality voiceover:

First and foremost, you must always act for the voice you’re recording. This is crucial because a voice over has to reflect the right emotions at the right time to connect with the audience.
Here are a few things you can do to perfect your voice acting:
Doing these things will not just help you adopt the character, but also give a more believable performance.
You can work with the best script possible, but if you aren’t delivering it correctly, the viewers won't be able to connect with it. So, to ensure this happens, make sure that your audio is as clear as possible.
While most audio clarity issues can be solved by picking up a high-quality microphone, there’s still a sibilance issue that you have to take care of.
Sibilance is a figure of speech where a hissing sound is created within a group of words through the repetition of "s" sounds.
Here are a few ways you can solve the sibilance issue in your voiceovers:
The more of you focus on improving your voice over quality, the more your audience will engage with your content.
Nothing dampens the quality of a video voice over more than a badly enunciated script, which is the ability to pronounce words clearly and correctly.
So make sure that you’re aware of the pronunciation of words, and are able to enunciate them with confidence.
Pacing is the speed at which you speak to share a story. If you speak quickly and stumble on words, or alternatively speak slowly, then you may risk losing the attention of your listeners.
This is why it is extremely important that a voiceover be recorded with the correct rhythm and tempo.
Research what the character demands, and then employ proper pacing techniques to bring it to life.
The best voiceover artists are excellent articulators — they neither over nor under articulate their sentences, and showcase expertise with a grip on language and accents.
You may be just be a naturally articulate narrator, but if even if you aren't, you can always learn multiple accents. Make sure you practice enough so you can connect with your audience through your content.
Creating video voiceovers can be a daunting task, but it doesn’t really have to be that way.
All you need is a bit of management, preparation, and consistency to produce high-quality voiceovers, so you can make your content more engaging, interactive and memorable.
Here’s an easy step-by-step guide to producing your next video voiceover.
Similar to how making a video requires a lot of planning, the first step of creating a professional video voiceover is preparing the script.
You may feel that you can simply press the record button and record whatever comes naturally to you. But you’ll be surprised with the amount of umm’s, and aah’s that you’ll end up with if you record without any script in hand.
This is why we suggest you write a word-for-word script, so not only can you get rid of those unwanted delays and distractions, but also keep track of all the topics you wish to cover in the voiceover.
Sure, you can change out some words and sentences in the recording stage, but simply having a script will give you the clarity of mind and confidence you need to record a high-quality professional video voiceover.
Here are a few tips you can use while writing a script for your next video voiceover:

Now that you have a complete script in your hand, it's time to move on to the next step.
At this point, you have two choices. You can either record the voiceover yourself or let an AI voice generator do it for you, turning your script into audio automatically.
Visme’s built-in text-to-speech generator makes this step easy. Paste your script, choose a natural-sounding voice, and let AI produce smooth, human-like narration directly inside the Visme editor.
The AI option is great if you don't want to record or don't have much time, and it's a relief for those who feel nervous about speaking into a microphone. If you want to explore other great AI voice options, check out our full guide: 10 Best AI Voice Generators for 2025: Tested & Ranked.
There's absolutely no doubt that in order to record a professional voiceover for your brand, you’ll have to invest in a good external microphone.
For voiceovers that are targeted at a small audience, a built-in microphone on a laptop or a smartphone may work in the beginning, but as you enter the realms of professionalism, you’ll find that there’s an apparent need to invest in an external mic to record a video voiceover.
Once you decide to buy a microphone, you’ll roughly have four types of microphones to choose from:
Out of all the options available to you, a USB mic will probably be the best pick for beginners. They’ll also be the cheapest ones to purchase.
But as you continue to scale your business and strive to improve the quality of your video voiceovers then you should ideally be focusing on investing in a condenser mic.
Check out this in-depth video by Curtis Judd that compares 6 of the best large diaphragm condenser microphones.
At the end of the video, he also shares some great insights on the usage and differences of small and large diaphragm condenser microphones — so watch out for that.
Buying an expensive microphone won't miraculously make your voiceover sound great. There are several other things to take care of before you can hit that record button.
Here are 4 things you need to do to prepare for your voiceover recording:
Now that you have chosen the perfect place to record your video voiceover and made all other necessary preparations, it's finally time to hit that record button.
If you're using Visme to make videos, you can record a voiceover directly inside the editor.

Additionally, here are a few tips that can help you record better voiceovers:
Once you’re done recording your video voiceover, it’s time for editing. At this stage, the aim is to prepare an audio file that you’re happy to add to your video.
In Visme, you have several options to edit your voiceovers and audio clips.

Start by taking out any “ums” and “ahs”, unwanted sentences, mispronounced words, and any other unneeded breaks from the voiceover.
Then move on to adjust the audio levels of your voiceover, so there isn’t any distortion or unwanted peaking. As we’ve already mentioned the desired recording range should be between -10db to -20db, with the maximum peaking at -6db.
Also, in case you have somehow captured some background noise, or are just looking to make the audio sound more crisp and powerful, you can always play around with the built-in audio effects in your audio editor to achieve the sound you’re looking for.
Once you’re satisfied with your edited voiceover, get ready to upload it to your video editor. This may just be a few clicks of the button depending on whether you're using an external recorder to record the voiceover or a built-in feature of your video editing software.
Here's how you can do that in Visme.

Creators who use an external software to record and edit voiceovers will naturally have to export the audio file and go into their video editing software to upload it.
Meanwhile, creators who record a voiceover through the built-in recording feature won’t have to go through the entire process, as their audio will already be in the system.
Regardless of the method you choose to record the voiceover, our aim at this stage is to mix and match the audio file with the video so nothing looks out of place.
For example, if you’re showing a particular software feature in the video, make sure the voiceover is aligned with the feature’s information, so the viewers can properly register it.
If you’re using Visme to create a corporate or sales video for your brand, you can directly upload your audio files to Visme’s editor. This can effectively save you tons of time and can even boost your productivity.

Did you know that 85% of Facebook videos are watched without sound?
That might look like an intimidating statistic to someone who spends a lot of time and effort creating a video voiceover. But that doesn’t mean you stop creating videos with narration altogether.
In fact, the trick is to respect the data and take essential steps to promote your content the right way.
We suggest that before you share your projects online, make sure you add text and subtitles to your video so that the people watching without sound can also interact with your content.
You can add on-screen text inside your video editors, such as Adobe Premiere and Final Cut Pro, which typically come with a number of built-in text options.
Alternatively, you can also add closed captions on video-sharing platforms like YouTube.
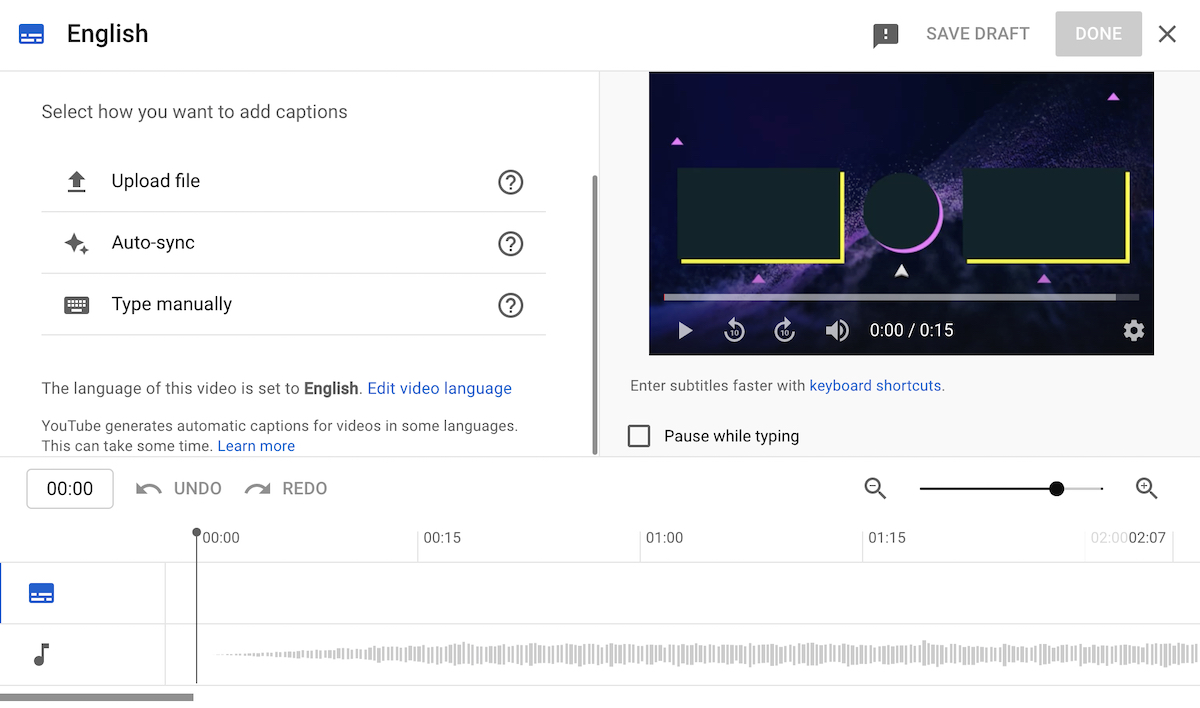
YouTube allows you to either manually enter your subtitles, or upload an external subtitle file and synchronize it with your video.
You can also go above and beyond to make your videos look more visually appealing. For example, vector icons and animations are proven to increase viewers’ interest in your videos.
As you begin to put together your first voiceover project, you’ll notice that there are several things that you need to be mindful of.
This includes:
But that doesn’t mean it's entirely impossible to create one on your own.
Like everything else, creating a video voiceover just comes with a bit of a learning curve. And as you continue to record more voiceovers, you’ll become more comfortable with the entire process.
So, if you’re just starting out or have a small audience to cater to, it's a good idea to attempt creating a video voiceover on your own.
And as you continue to scale your business, you can always hire the services of a professional who’ll help you create a high-quality video voiceover thanks to their skills and expertise.
Voiceovers can help you create a unique identity for your brand. You can use them in your explainer videos, corporate messaging and even in promotional content.
With the help of this guide, you can create high-quality, professional voiceovers for your videos and engage with your audience in a better way.
If you’re looking for an online video editing tool to create your video voice overs, check out our online video maker that offers complete customization, ready-made templates and an incredibly easy-to-use timeline editor.
Design visual brand experiences for your business whether you are a seasoned designer or a total novice.
Try Visme for free![The Best Interactive Content Platforms in 2025 [Tested & Reviewed]](https://visme.co/blog/wp-content/uploads/2025/10/The-Best-Interactive-Content-Platforms-in-2025-Thumbnail-500x280.png)